furniture etiketine sahip kayıtlar gösteriliyor. Tüm kayıtları göster
This post contains affiliate links.

About a year ago, my mom made a big change and decided to move closer to me. She built a house from scratch in a beautiful area of our town. The only problem? She moved from a house full of character to a builder grade home...one in hundreds, instead of one of one. I promised her that we will build character into her new house. So, slowly, I've been building pieces and adding character over these past several months. We have lots more to do and many rooms to finish, but it's happening. That being said, I'll be sharing lots of projects going on in her house with you. The first of which is this DIY wood x console table for her entry way...which was actually a surprise present I made for her birthday. It was so much fun having her walk in and see it.

 The hallway for her entry is so long and crazy wide. I thought of multiple ways to furnish it, but ultimately came up with this 8' long and 17" wide table. She was in desperate need of storage spaces. With this open concept plan, and quite a bit smaller house, she lost storage space along with storage pieces she once used. So, my requirement was to build something to take up this space that offers storage and adds character.

I decided to go with this plan from Ana White(full tutorial here). I made the length a little bit longer, but the steps are all the same. I'll share below with how I got the white wash weathered wood finish.

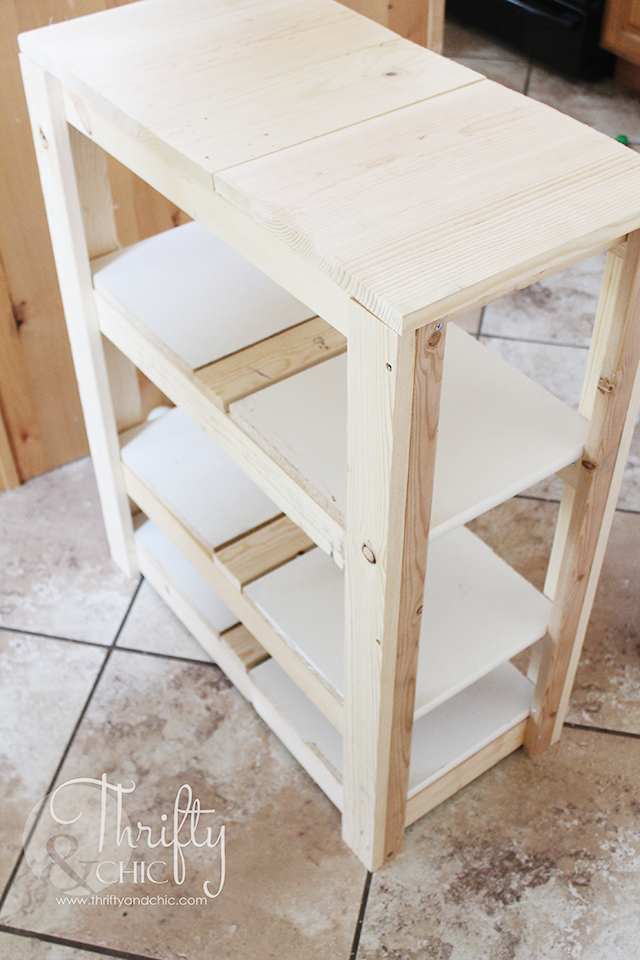
First step in building this table was to create the frame. Using 2x2s and 2x4s, I attached them together using pocket hole screws.
The next step was to secure the bottom and middle shelves. These are 1x12 boards.
 They were secured to one frame first using wood glue and pocket hole screws.
Then I secured to the other frame in the same manner. This is a look at it upside down. I added the supports with the 2x4s on the top and bottom of each side, and a 2x2 along the middle shelves to the supporting 2x4 legs.
 Next was adding the "X". If I told you this part was easy, I'd be lying. It took me longer to make sure these were correct than it took me to build the entire piece. After many....many attempts, I settled. :) I think they turned out alright in the end.
 I then added the top using 2x6 at 8' long.
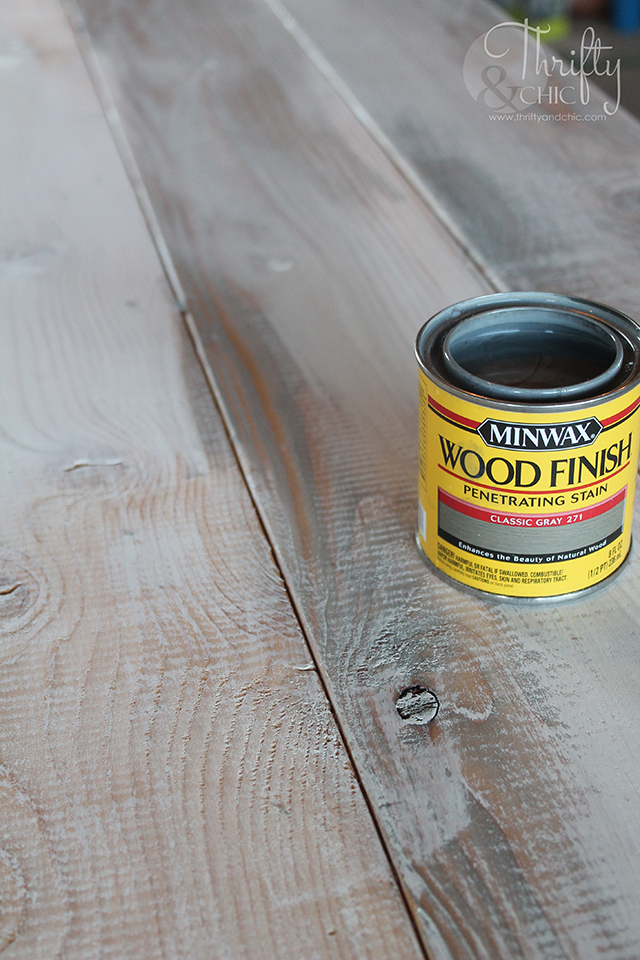
 Now for the finish. This is probably one of my favorite finishes out of all of the pieces I have done. I white washed the wood using interior latex paint in satin. The exact paint is Swiss Coffee by Behr. I made sure to keep a lot of the wood grain showing and only did one light coat. I did make it heavier in some areas and not as much in others.


 I then took Minwax's Classic Grey and went over the entire piece using some old cloths. If it was heavier in areas that I wished, I quickly wiped it away to let the white show through a little more. At the end, I then wiped it entirely down with a clean cloth, making sure to get up any unabsorbed stain.
 And that's it! It gave it a beautiful natural looking weathered look.
 I think the "X" and the weathered look gave this piece the perfect character for this space.

 You can see here how long the entryway is....and I'm not even out the door in this picture. There's still a lot of space behind me. We have lots of plans for these walls, which include.....board and batten. Who would have guessed? Ha!
 Styling this was fun...and easy! I knew we needed storage, hidden storage. That came in the form of these baskets from Home Goods.
We found this beautiful mirror from Home Goods also and flanked the sides with the blue glass vase and lamp. Added extra height to the left side with the candlesticks from Hobby Lobby. And of course, I added my go to faux plants and books! 

 I am so excited to get going on this floor to ceiling board and batten. I think it's really going to add such an impact in here! 
Here's a good view of this space before she moved in. We decided to go with all white walls to save on cost...mainly knowing we for sure wanted the ceilings to be white and in order to make the ceilings white, either all the walls also needed to be white or we needed to pay for 3 tone paint. I figured white was the way to go. You can always go and add simple accent walls of colors. That's a whole lot easier than trying to paint an entire house's ceiling :) 
Here's the after of this area one more time....and kind of the before too since this will all be changing with the walls in the coming months :) 
These floors are interesting too. They look dirty, but they aren't. They have a mix of grey in with the brown that tend to reflect the light. They are beautiful and have a great mix of colors which easily match greys and beiges. 

The next project I'll be sharing in here is a HUGE one! It made all the difference in her house. I'll be sharing that with you next week! 

Pin for later:


Disclosure of Material Connection: Some of the links in the post above are “affiliate links.” This means if you click on the link and purchase the item, I will receive an affiliate commission. Regardless, I only recommend products or services I use personally and believe will add value to my readers. I am disclosing this in accordance with the Federal Trade Commission’s 16 CFR, Part 255: “Guides Concerning the Use of Endorsements and Testimonials in Advertising.”

My mom recently just built a house. I'm so excited to start showing it off and all that we have planned for it! The first thing that was a must was a desk. The desk I had made for her before didn't fit through the doorway to her new office. It's a shame because I really loved that desk! (click here to check it out. It was made from a dresser!) :) But, that also meant I got to design a desk for her and her needs. She gave me the exact size she needed with everything so I got to work!
DIY desk with storage. Farmhouse desk tutorial. Desk tutorial with hidden cord storage. Desk organizing ideas.
 The total size of this desk is 30" deep, 54" wide and 29" tall. The middle section is 36" wide...perfect for a chair. These are the requirements she had, so I went forward from there!

Here's my cut list for this size of desk. It, of course, can be changed to suit your needs, longer, narrower, etc.
DIY desk with storage. Farmhouse desk tutorial. Desk tutorial with hidden cord storage. Desk organizing ideas.
6 -2x4 @ 28 1/4" (legs)
3 - 2x4@ 36" (top and bottom long rails)
5 - 2x4 @ 21" (side rails)
3 - 2x2 @ 21" (side shelf supports)
4 - 2x2 @13" (front shelf supports)
4 - 2x4 @ 13" (shelf rails)
3 pieces of 3/4" plywood at 24 1/2x13" (shelves)
1 piece of 3/4" plywood at 30x54" (top)

Step 1: Using a pocket hole jig, create 2 holes on each side rail. Holes should be on the same facing side. Secure 1 side rail to the top portion of a leg. I used wood glue and the interlocking screws in 1 1/2" length.
DIY desk with storage. Farmhouse desk tutorial. Desk tutorial with hidden cord storage. Desk organizing ideas.
 Step 2: Attached the 2nd leg to the top side rail.
DIY desk with storage. Farmhouse desk tutorial. Desk tutorial with hidden cord storage. Desk organizing ideas.
 Step 3: Now, 3" up from the bottom of the legs, place another side rail and secure into place on both legs. Do steps 1-3 again to create a second piece.
DIY desk with storage. Farmhouse desk tutorial. Desk tutorial with hidden cord storage. Desk organizing ideas.
 Step 4: Now do Steps 1-2 again. Don't do step 3 on this piece. Now, you should have 2 pieces with 2 side rails, and one with a top side rail only.
DIY desk with storage. Farmhouse desk tutorial. Desk tutorial with hidden cord storage. Desk organizing ideas.
 Step 5: Create pocket holes in each long rail. Secure the top and bottom long rails to section you created in step 4. The bottom rail should sit 3" up from the bottom of the leg and the top rails should be flush.
DIY desk with storage. Farmhouse desk tutorial. Desk tutorial with hidden cord storage. Desk organizing ideas.
 Step 6: Add one of the other sections you created in step 3. Make sure all pocket holes are facing inside. Secure this section to the long rails, both top and bottom making sure the bottom is once again 3" from the bottom of the leg.
DIY desk with storage. Farmhouse desk tutorial. Desk tutorial with hidden cord storage. Desk organizing ideas.
 Step 7: On the other section you created in step 3, add the top shelf rails (13") to top of the legs, making sure they are flush and secure in place with pocket hole screws and glue.
DIY desk with storage. Farmhouse desk tutorial. Desk tutorial with hidden cord storage. Desk organizing ideas.
 Step 8: Now add the bottom shelf rails 3" from the bottom on each of these legs. The front one I placed 1/2" in, the back is flush. Secure in place.
DIY desk with storage. Farmhouse desk tutorial. Desk tutorial with hidden cord storage. Desk organizing ideas.
 Step 9: Secure the 21" 2x2 long shelf rails into place on the side of the larger piece. The distance between these ones will be determined upon the size of the baskets you used. For the top piece, we decided to make a laptop shelf. So, this is super small and only a 2" distance from the top 2x4 side rail. From there, we made it about 7" for each shelf since our basket was 6" high. The bottom rails should sit 5" from the bottom to keep flush with the 2x4 front bottom shelf rail.
DIY desk with storage. Farmhouse desk tutorial. Desk tutorial with hidden cord storage. Desk organizing ideas.
 Step 10: add the shelf section to the larger section now. Connect all the shelf rails making sure to keep the top ones flush and the bottom sections 3" from the bottom of the legs.
DIY desk with storage. Farmhouse desk tutorial. Desk tutorial with hidden cord storage. Desk organizing ideas.
 Step 11: Using the same distances you did in Step 9, add the shorter shelf support rails (13") to the front and back. I inset these by 1/2" from the front, but kept them flush on the back.
DIY desk with storage. Farmhouse desk tutorial. Desk tutorial with hidden cord storage. Desk organizing ideas.

DIY desk with storage. Farmhouse desk tutorial. Desk tutorial with hidden cord storage. Desk organizing ideas.
 Step 12: Add the shelves to the inside of all the supports. I used 2" nails and my nail gun to secure them into place. You will want to make sure your measurements are correct before cutting these. Mine did vary by 1/4 per shelf because of the placement of the rails.
DIY desk with storage. Farmhouse desk tutorial. Desk tutorial with hidden cord storage. Desk organizing ideas.
 Step 13: This step was part of what my mom wanted in her desk. She wanted a shelf underneath the top that would hold a power strip. The cords on her desk would then feed through a hole on the top of the desk, down to this shelf. And then only a single cord will be showing, the one to the power strip. This is an optional piece and not mentioned above on the cut list. But this was a 1x8 board cut a 36" and placed on back top of the longer section.
DIY desk with storage. Farmhouse desk tutorial. Desk tutorial with hidden cord storage. Desk organizing ideas.
 Step 14: Next, I filled in all the holes, gaps and seams with wood putty. I sanded those to a smooth finish.  Then painted it with Sherwin Williams Pure White in semi-gloss.
DIY desk with storage. Farmhouse desk tutorial. Desk tutorial with hidden cord storage. Desk organizing ideas.
 Step 15: Not shown. I sanded the top plywood piece and then added wood filler along the sides to hide the character of the plywood. I then sanded that down to a smooth finish and stained the sides and the top with Classic Grey. I added 3 coats of polyacrylic to the top.

Step 16: I secured the top piece to the rest of the desk with wood glue and 1 1/2" nails.
DIY desk with storage. Farmhouse desk tutorial. Desk tutorial with hidden cord storage. Desk organizing ideas.
 I love how this desk turned out! It's simple yet works perfectly for what she needed. I can't wait to show you guys her total office makeover when we get it done!
DIY desk with storage. Farmhouse desk tutorial. Desk tutorial with hidden cord storage. Desk organizing ideas.

DIY desk with storage. Farmhouse desk tutorial. Desk tutorial with hidden cord storage. Desk organizing ideas.
 Here's the idea for the laptop shelf. She'll be using monitors that are connected to the laptop. So, the laptop needed to be close but out of the way. This is also just great for storage for anyone who just wants to use it as a place to keep their laptop when not in use.
DIY desk with storage. Farmhouse desk tutorial. Desk tutorial with hidden cord storage. Desk organizing ideas.
These baskets are from Target although I have found some similar at Home Goods.
DIY desk with storage. Farmhouse desk tutorial. Desk tutorial with hidden cord storage. Desk organizing ideas.
This was a fun piece to create and make adjustments to! I used the plans from Homemade Haven and tweaked them from there to suit my needs.

Pin for later:
DIY desk with storage. Farmhouse desk tutorial. Desk tutorial with hidden cord storage. Desk organizing ideas.

Pin It

DIY in between washer and dryer storage cabinet for the laundry room | Small laundry room organization and storage ideas
 In my last few posts, I have shared my updated laundry room. Hope you all aren't sick of it yet! There's a whole lot of projects that went on in there to make it what it is today. In my reveal post, I had some small cubbies placed in between my washer and dryer for storage. Truth: I stole those from my kids play area to stage. I finally got around to actually building the storage shelves I imagined for the space, and wanted to share with you the tutorial :)

As with everything, the size of this will differ depending on your space. I made it be a perfect fit between my washer and dryer and close to the same height. So, you will need to adjust your measurements accordingly.

Step 1: Build the legs. To give more clearance for the boxes to come out the front, I chose to use 1x2s on the front side on the front legs. The other pieces were 1x3s all measured at 34" long.
DIY in between washer and dryer storage cabinet for the laundry room | Small laundry room organization and storage ideas
 I butted up one 1x2 against a 1x3, glued in place and then screwed in 1 1/2" screws. I did this with the other 1x2 and 1x3, and then to the 1x3s against the 1x3s. So, two 'legs' have a 1x2 against a 1x3 and two have all 1x3s -these will be the back legs.
DIY in between washer and dryer storage cabinet for the laundry room | Small laundry room organization and storage ideas
 Step 2: Place the legs on a level surface. I placed the 1x2 side on the left and the 1x3 leg on the right. Remember in this whole process the 1x2 is going to be the forward facing piece. I then connected the legs with four 1x3s measured at 25" long. The first one is at the top of the legs. Then the second and third on are 12" from the top of each 1x3. Then the last one measures 7" from the top of the above 1x3. The last one I had sit 1/2" from the ground to allow room for water draining (just in case).
DIY in between washer and dryer storage cabinet for the laundry room | Small laundry room organization and storage ideas
 Step 3: I then got the other set of legs, and placed the 1x2 side on the right this time, then placed the horizontal 1x3s in the same locations as the ones above in step 2.
DIY in between washer and dryer storage cabinet for the laundry room | Small laundry room organization and storage ideas
 Step 4: I then cut three 1x3 pieces at 12" each, and one 1x2 at 12". I glued and screwed these in with 1 1/4" screws to the outside pieces of wood. These are what will connect each side. The 1x2 piece was used at the top against the 1x2 leg piece. This could be difficult to screw the pieces in on the 1x2 leg piece, so it may make since to countersink the screw from the front instead of trying to hide the screw on the inside.
DIY in between washer and dryer storage cabinet for the laundry room | Small laundry room organization and storage ideas
 On the bottom pieces, make sure you place the 1x3 against the horizontal 1x3 and not flush on the bottom -leaving that room for water drainage.
DIY in between washer and dryer storage cabinet for the laundry room | Small laundry room organization and storage ideas
 Here's the top 1x2 piece. As noted in other picture, I actually ended up moving this so the shorter side was facing out to allow more clearance for the boxes. So, essentially, I just rotated this 90 degrees, then screwed it in from the outside.
DIY in between washer and dryer storage cabinet for the laundry room | Small laundry room organization and storage ideas
 Step 5: Connect the other side using wood glue and screws.
DIY in between washer and dryer storage cabinet for the laundry room | Small laundry room organization and storage ideas
 Before I continued on, I wanted to make sure this actually did fit in the area I was building it for, and it did! You can see the drain right in the middle; that is the reason I left that small clearance on the bottom.

DIY in between washer and dryer storage cabinet for the laundry room | Small laundry room organization and storage ideas
 Step 5: Cut the wood for the shelves and the top. I actually just used what I had lying around for this, so if you want a better fit on things, you can do the adjustments :) But for me,  I used 1x12 mdf shelves I had. These actually measure at 11". So, I cut them at 12" to make them fit inside the unit. I also cut 1x3s at 12". For the top, I ended up using two 1x12s and one 1x6 cut at 13.5" This allowed for a little bit of an overhang on the front and back.
DIY in between washer and dryer storage cabinet for the laundry room | Small laundry room organization and storage ideas
 Step 6: Place the shelves. Secured them with a nail gun and 1 1/4" nails. If you don't want a gap in between your wood, then cut the middle piece from a scrap piece of the mdf to fit that width. I also nailed in the top.
DIY in between washer and dryer storage cabinet for the laundry room | Small laundry room organization and storage ideas
 Step 7: Fill in all holes with wood puddy. Sand.

Step 8: Paint or stain. I painted mine Swiss Coffee by Behr to match the color of the walls and shelves in the room. For more durability, seal with poly.
DIY in between washer and dryer storage cabinet for the laundry room | Small laundry room organization and storage ideas
 I had a dream about creating the boxes to make them look like mini barn doors, but then I found my reclaimed wood in my backyard and called it good :) I'll do another tutorial on how to make these boxes soon and link back.
DIY in between washer and dryer storage cabinet for the laundry room | Small laundry room organization and storage ideas
 This unit has so much storage it's unreal! And I love the length of it. It has made my laundry room seem that much bigger and has added a ton of useful space.
DIY in between washer and dryer storage cabinet for the laundry room | Small laundry room organization and storage ideas
 The drawers pull out easily, and hide a lot of stuff.
DIY in between washer and dryer storage cabinet for the laundry room | Small laundry room organization and storage ideas
 I made the drawers to only go half way back, so I have a lot of storage behind them for things I don't use that often.
DIY in between washer and dryer storage cabinet for the laundry room | Small laundry room organization and storage ideas

You can't really see in the before picture (which is probably a good thing), but the cabinet I had in the corner was super small and black. It was like 6 inches shorter than the washer and about 1/3 of the length. It was also just completely filthy. I had bought one of those humongous laundry detergents with the spout, and that spout always leaked. It leaked everywhere ruining the cabinet. I scrubbed and scrubbed, but ultimately I lost interest anyway. I hated the thing, I didn't care anymore. So, then all that sticky residue just collected lots of lint and debris...you get the point :)
DIY in between washer and dryer storage cabinet for the laundry room | Small laundry room organization and storage ideas
Now that I have more hidden storage with these shelves, hopefully I'l be able to keep my laundry room a little cleaner...or at least less cluttered.
DIY in between washer and dryer storage cabinet for the laundry room | Small laundry room organization and storage ideas
You can see the full reveal by clicking here, and the tutorial on how to do the shiplap and shelves by clicking here.

PIN FOR LATER:
DIY in between washer and dryer storage cabinet for the laundry room | Small laundry room organization and storage ideas