This post contains affiliate links.
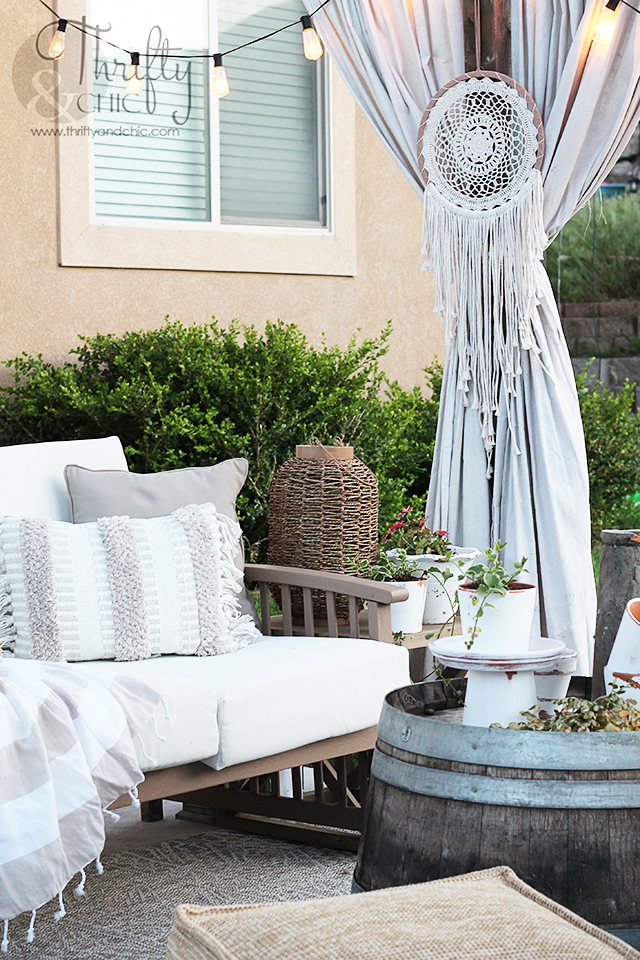
I shared with you all my updates to my patio over the past month, and the biggest change to date was this short privacy wall and planter box.

I say biggest change because it is hiding THE biggest eyesore :) (and not just the dog butt, ha!)

We spent a whole bunch of money on landscaping gone wrong. A rock retaining wall was poorly built, things didn't get figured out in enough time before a fence was put in. Then there was no way to get a bobcat or anything in to move these half ton boulders....anyway. It's one of the biggest aggravations I have with my house and yard. And the worse thing? I stare at it every day from the top of my patio stairs, from my patio, from the playhouse, from my neighbors yard...etc etc etc. Serious. The bane of my existence at times. We have some ideas to fix it up, but nothing is getting done. I don't have the muscles it takes to move these puppies....plus, I have no idea what to do. I would probably get smooshed. As you can see in the picture above, my husband has started using it as a place to throw the lawn shavings. So, that's fun. Anyway. Long story long :) I decided to fix it on my own. By covering it up!

Here's how I did it. First of all, I started with my base that was already there. I made these privacy screens a couple of years ago from some drop cloths and 4x4s. You can see the full tutorial on how to make them here.
Next, I cut another 4x4 at 37" placed it in the middle of the expanse between the taller 4x4s of the privacy screen. I was going to dig this one in, but opted not too. The other 4x4s are secured into the ground, so I figured I could get away without having to do this one. I placed the first 5" cedar fence board on the bottom, making sure it was level. Using 2 pieces of 1x2 cut at 2.5" each, I spaced each cedar board all the way up to the top of the shorter 4x4.
 To create the planter box section, I placed the last piece of board on top of the other without the space. Secured the bottom inch or so into the short 4x4 and of course the 4x4 on the other side. I then cut a 1x4 to fit the expanse, which was about 94" for me.
 I sat this on top of the middle 4x4.
 To make sure it had something else to sit on, I placed a small cut 1x4 on both the taller 4x4s, making sure everything was level. I then secured the horizontal 1x4 into these "cleats".
 I continued the boards on until I hit the last 4x4. So, with this, I have three 4x4s that are tall to hold the curtains. Then two 4x4s that are shorter that go in middle of each expanse.


I finished it all up by creating the same look on the back, but staggering it in between the front gaps.
I then stained all the wood Dark Walnut by Minwax.

 If I could only tell you how much of a difference this has made. We would never eat out here before. Never. Okay, twice. But 2 times in 10 years is pretty much never. Even though my eyesore technically still exists, it's just a sore now since my eye no longer sees it all the time :)
 This space is a great place to spend the hot evenings. To add to the ambiance, I strung solar lights along the planks.

 Now for reals though...what would you do with the eye sore? No sprinkler lines can run through it since it's all stacked up boulders now filled with dirt and dried grass. It's probably about time we really figure it out! :)


Pin for later:


I shared with you all my updates to my patio over the past month, and the biggest change to date was this short privacy wall and planter box.

I say biggest change because it is hiding THE biggest eyesore :) (and not just the dog butt, ha!)

We spent a whole bunch of money on landscaping gone wrong. A rock retaining wall was poorly built, things didn't get figured out in enough time before a fence was put in. Then there was no way to get a bobcat or anything in to move these half ton boulders....anyway. It's one of the biggest aggravations I have with my house and yard. And the worse thing? I stare at it every day from the top of my patio stairs, from my patio, from the playhouse, from my neighbors yard...etc etc etc. Serious. The bane of my existence at times. We have some ideas to fix it up, but nothing is getting done. I don't have the muscles it takes to move these puppies....plus, I have no idea what to do. I would probably get smooshed. As you can see in the picture above, my husband has started using it as a place to throw the lawn shavings. So, that's fun. Anyway. Long story long :) I decided to fix it on my own. By covering it up!

Here's how I did it. First of all, I started with my base that was already there. I made these privacy screens a couple of years ago from some drop cloths and 4x4s. You can see the full tutorial on how to make them here.
Next, I cut another 4x4 at 37" placed it in the middle of the expanse between the taller 4x4s of the privacy screen. I was going to dig this one in, but opted not too. The other 4x4s are secured into the ground, so I figured I could get away without having to do this one. I placed the first 5" cedar fence board on the bottom, making sure it was level. Using 2 pieces of 1x2 cut at 2.5" each, I spaced each cedar board all the way up to the top of the shorter 4x4.


I finished it all up by creating the same look on the back, but staggering it in between the front gaps.
I then stained all the wood Dark Walnut by Minwax.


Follow me on my social for sneak peaks, live videos, and fun new things that are going on!
Pin for later:


Disclosure of Material Connection: Some of the links in the post above are “affiliate links.” This means if you click on the link and purchase the item, I will receive an affiliate commission. Regardless, I only recommend products or services I use personally and believe will add value to my readers. I am disclosing this in accordance with the Federal Trade Commission’s 16 CFR, Part 255: “Guides Concerning the Use of Endorsements and Testimonials in Advertising.”


