This post contains affiliate links.
Heya! It's about that time that I share with you the other side of my patio, since I shared with you my "living room" portion last week :) I actually used to love this side....you know, back in the day before my dog broke my farmhouse table. Yeah. I tried to fix it multiple times, but then it just got too bad and I decided to take it apart. It was hard being that it was the first huge piece of furniture that I built..and I was about 7 months pregnant with my first when I built it. Kind of sentimental. So tearing it down was hard, but I decided that I'll be using the scraps to build a console table for my entryway hall. Here's what it looked like in it's glory days :) You can see the whole post on it here:


The privacy curtains were still there, but the rug was ruined. The chairs were replaced with a bench that broke from the weather. The table was never used besides something to cut wood on. So...yeah. To say the least...I never wanted to be in the area. Oh...and you see that little area by the fence? Those rocks and dirt? Now imagine a place full of dead weeds. That was an overpriced landscaping job that went bad and never got fixed. Then the fence was put up, and now it's pretty impossible (just pretty dang hard and expensive) to fix it now. So, I have lived with that ugly...ugly eyesore for too long. I decided that since I can't move 30 giant boulders, I'll just cover it up :) Yeah, I know...one of these days we will have to figure out that side of the yard, but until then, I don't have to stare at it!
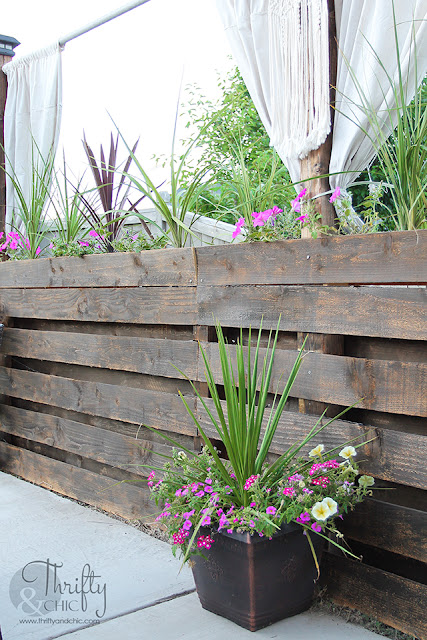
 ....because I built this wall! This planter wall was the best idea (besides the privacy screens) that I've every done to this patio. I wanted it to go all the way up, but didn't want to block our beautiful mountain views, so I decided to do a little more than half way and make a planter out of it. I'll be sharing the tutorial on how to make this soon!
And since my table was ruined, I really wanted a new one that I could enjoy actually eating at. That other table was maybe used twice to eat on. For reals. I'm ashamed to say that, but I never had the right chairs to fit it just perfectly, and it just didn't appeal to me. It didn't help that I had to over look a garden of dead weeds...So, I replaced the table with this five piece patio set!


And you know what, we have eaten at this table more in the past month than we have on our inside table. Seriously! Every day for lunch and most of the times for dinner. I was eyeing this table on multiple online sites. I ultimately bought it from Amazon (link here). I have nothing but good things to say about it so far! It's held up....and most of all, it has yet to be blown away from our horrendous wind! That was my biggest fear. I didn't want a glass top, but knowing that this came with one that could come off sold me. I wasn't planning on using the glass because of said winds, but I decided to put the glass on just to protect the table. I was super concerned that it would fall down with a wind gust, but it has stayed on so far!
 The chairs only came with a bottom cushion. That being said, I was thankful it came with any at all. Most of the sets I looked at didn't have them. I decided to throw some outdoor throw pillows onto the back to add more cushion. These are from Home Goods.
 And since my rug was ruined. Which was such a bummer....I really loved that rug. I decided to go for a smaller rug this year, just in case. I wasn't spending $200+ on a rug that might last 2 years. So, instead I found this one for around $40 on Target (link).

I realized soon after buying this patio set, that I actually loved lounging in it too, so I bought this cute little stool. I have plans to redo it, but for now it's acting as a plant stand...and a foot stool when needed.

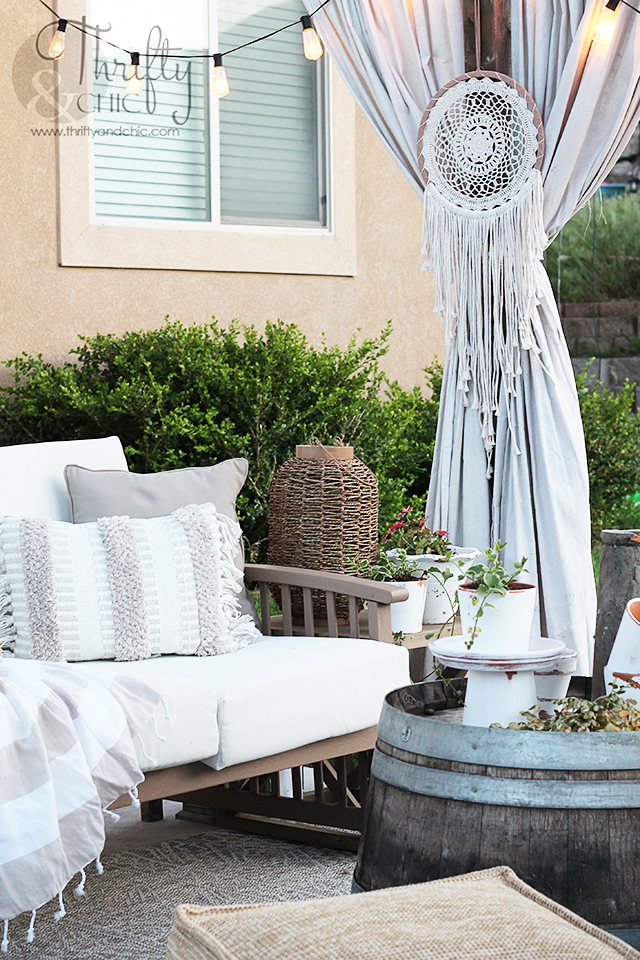
 I decided to dress up my privacy screen with some macrame. I feel like you should decorate your outdoors just like your indoors. Make it come to life. I bought these two macrame pieces off of Amazon (link) and hung them from the posts. They have actually weathered really well so far! I don't know how many seasons they would last being out here, but for the past month or so, they have been good! ....with all the rain and crazy wind :)

 One of my favorite parts of this whole makeover, and this planter wall...are the lights!
 I had to put some on here...just had to! The best thing about these are that they are solar...not need to think about it or plug something in.
 I love being out in this space day in and day out. The weather is getting hot (finally!), so it's the perfect place to sit and enjoy it.

I still can't believe that this space...

 Used to look like this! I know... I know, this was like 3 years ago, but still!
 And I promise you the tutorial on this wall! It cost me around $100 to make, and is relatively easy! So, check back next week! :)


Disclosure of Material Connection: Some of the links in the post above are “affiliate links.” This means if you click on the link and purchase the item, I will receive an affiliate commission. Regardless, I only recommend products or services I use personally and believe will add value to my readers. I am disclosing this in accordance with the Federal Trade Commission’s 16 CFR, Part 255: “Guides Concerning the Use of Endorsements and Testimonials in Advertising.”
Heya! It's about that time that I share with you the other side of my patio, since I shared with you my "living room" portion last week :) I actually used to love this side....you know, back in the day before my dog broke my farmhouse table. Yeah. I tried to fix it multiple times, but then it just got too bad and I decided to take it apart. It was hard being that it was the first huge piece of furniture that I built..and I was about 7 months pregnant with my first when I built it. Kind of sentimental. So tearing it down was hard, but I decided that I'll be using the scraps to build a console table for my entryway hall. Here's what it looked like in it's glory days :) You can see the whole post on it here:
Well, here's what it looked like before this makeover a couple of years ago...and pretty much what it ended up looking like just before the table broke. Not so awesome and not very welcoming.


And since my table was ruined, I really wanted a new one that I could enjoy actually eating at. That other table was maybe used twice to eat on. For reals. I'm ashamed to say that, but I never had the right chairs to fit it just perfectly, and it just didn't appeal to me. It didn't help that I had to over look a garden of dead weeds...So, I replaced the table with this five piece patio set!


And you know what, we have eaten at this table more in the past month than we have on our inside table. Seriously! Every day for lunch and most of the times for dinner. I was eyeing this table on multiple online sites. I ultimately bought it from Amazon (link here). I have nothing but good things to say about it so far! It's held up....and most of all, it has yet to be blown away from our horrendous wind! That was my biggest fear. I didn't want a glass top, but knowing that this came with one that could come off sold me. I wasn't planning on using the glass because of said winds, but I decided to put the glass on just to protect the table. I was super concerned that it would fall down with a wind gust, but it has stayed on so far!


I realized soon after buying this patio set, that I actually loved lounging in it too, so I bought this cute little stool. I have plans to redo it, but for now it's acting as a plant stand...and a foot stool when needed.


I still can't believe that this space...


Follow me on my social for sneak peaks, live videos, and fun new things that are going on!
pin for later:

Disclosure of Material Connection: Some of the links in the post above are “affiliate links.” This means if you click on the link and purchase the item, I will receive an affiliate commission. Regardless, I only recommend products or services I use personally and believe will add value to my readers. I am disclosing this in accordance with the Federal Trade Commission’s 16 CFR, Part 255: “Guides Concerning the Use of Endorsements and Testimonials in Advertising.”


