makeover etiketine sahip kayıtlar gösteriliyor. Tüm kayıtları göster
I was provided product by DecoArt and compensated to write about this project, but all thoughts, opinions, and ideas are my own :)

I used to be so organized while growing up. Everything had it's place. I'm not sure what happened in my 20s, but for some reason that is sooo not the case anymore. I like to think everything has it's place still, but I'm definitely far from the organized person I was in the past. I have lots of spots of clutter. 

I feel like January is always a good time to start organizing and decluttering challenges. I'm not up for a challenge itself, but I'm all for organizers to help keep my life a simpler...and cleaner. This cute little one can be found on Amazon. 
Organizer hack. Organization and decluttering ideas. Bathroom organization ideas. Desk organizer. DIY desk organizer makeover.
 Not quite my style. It's kind of screaming for a makeover, don't you think? I updated it to look like this: 
Organizer hack. Organization and decluttering ideas. Bathroom organization ideas. Desk organizer. DIY desk organizer makeover.
 Paint can do amazing things! I used DecoArt's Americana Acrylics to achieve this look. The colors I used: White Wash, Desert Cactus, Dried Clay, and Summer Squash. 
Organizer hack. Organization and decluttering ideas. Bathroom organization ideas. Desk organizer. DIY desk organizer makeover.
Other products I used:

  • Sandpaper
  • Rose cut out in multiple sizes (I cut mine out using my Silhouette)
  • Leather stripes and/or draw pulls
  • 2 washers
  • Drill


Step 1: This surface is pretty shiny, so I scratched it up a little using some sandpaper. This will help the paint adhere better.
Organizer hack. Organization and decluttering ideas. Bathroom organization ideas. Desk organizer. DIY desk organizer makeover.
 Step 2: Paint the whole thing, besides the inside, with White Wash. This will take multiple coats. Use a hair dryer to speed up the process.
Organizer hack. Organization and decluttering ideas. Bathroom organization ideas. Desk organizer. DIY desk organizer makeover.
 Make sure to get the edges for a good even look.
Organizer hack. Organization and decluttering ideas. Bathroom organization ideas. Desk organizer. DIY desk organizer makeover.
 Step 3: Using vinyl cut outs, place your design on the top shelf of the organizer. I used this rose motif in multiple sizes. To get it in the corners, bend the design and place it in the corner first, and then continue to press down the design from there. My largest rose is about 7" in diameter. The smallest one is about 3".
Organizer hack. Organization and decluttering ideas. Bathroom organization ideas. Desk organizer. DIY desk organizer makeover.
 Step 4: In a somewhat random, but strategically placed way, paint some of the petals of each rose with Desert Cactus. I used a stipple brush for this, but instead of a blotting technique, I smoothed it out. 
Organizer hack. Organization and decluttering ideas. Bathroom organization ideas. Desk organizer. DIY desk organizer makeover.
 Step 5: Next, paint some petals with the Dried Clay.
Organizer hack. Organization and decluttering ideas. Bathroom organization ideas. Desk organizer. DIY desk organizer makeover.
 Step 6: Now finish each rose off with painting the remainder petals Summer Squash.
Organizer hack. Organization and decluttering ideas. Bathroom organization ideas. Desk organizer. DIY desk organizer makeover.
 Step 7: Carefully peal off the vinyl to reveal the design. Do any touch ups if necessary. 
Organizer hack. Organization and decluttering ideas. Bathroom organization ideas. Desk organizer. DIY desk organizer makeover.
 Step 8: Paint the sides of the organizer with Dried Clay. I then added another rose in White Wash. You can either do this beforehand by placing the petals down first, and then painting over it with the Dried Clay. Or add the stencil of the rose afterwards, and painting the White Wash over the Dried Clay.
Organizer hack. Organization and decluttering ideas. Bathroom organization ideas. Desk organizer. DIY desk organizer makeover.
 Step 9: To add a little interest to the drawers, I painted the sides with Dried Clay, so when you pull them out there will be some color.
Organizer hack. Organization and decluttering ideas. Bathroom organization ideas. Desk organizer. DIY desk organizer makeover.
 Step 10: I decided to use the back of each drawer as the front. I'm not a fan of that little cutout. On the back of each drawer, I found the middle and drilled a small hole. 
Organizer hack. Organization and decluttering ideas. Bathroom organization ideas. Desk organizer. DIY desk organizer makeover.
 Step 11: On the bottom two drawers, I added my own little handle by using 8" leather strips. I pulled the strips through a washer, and then through the hole. I tied the leather into a knot on the backside of the drawer. 
Organizer hack. Organization and decluttering ideas. Bathroom organization ideas. Desk organizer. DIY desk organizer makeover.
 I used a cute little wood pull I got from Hobby Lobby on the top drawer. 

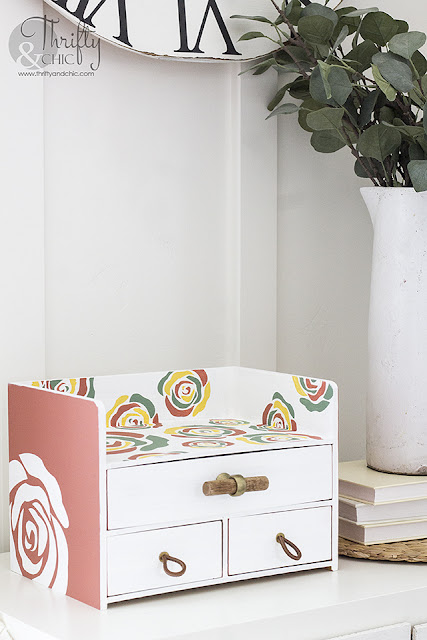
Here's the finished look:
Organizer hack. Organization and decluttering ideas. Bathroom organization ideas. Desk organizer. DIY desk organizer makeover.
 I love how this design looks different from every angle. The question is, what area is this going to help organize in my house? My girls are already asking for it in there bathroom. So, I think that's where it's going to live. 
Organizer hack. Organization and decluttering ideas. Bathroom organization ideas. Desk organizer. DIY desk organizer makeover.
The top will be perfect for little mason jars full of cotton balls and q-tips. The drawers will be great organizers for hair supplies! What do you think? What you would you use this little organizer for? The possibilities are endless! 
Organizer hack. Organization and decluttering ideas. Bathroom organization ideas. Desk organizer. DIY desk organizer makeover.
Want more inspiration like this from DecoArt and other amazing bloggers? Follow here!
www.decoart.com
Facebook
Instagram
Pinterest


Follow me on my social for sneak peaks, live videos, and fun new things that are going on!


Want this desk organizer? Find it here:


Pin for later:
Organizer hack. Organization and decluttering ideas. Bathroom organization ideas. Desk organizer. DIY desk organizer makeover.


This means if you click on the link and purchase the item, I will receive an affiliate commission. Regardless, I only recommend products or services I use personally and believe will add value to my readers. I am disclosing this in accordance with the Federal Trade Commission’s 16 CFR, Part 255: “Guides Concerning the Use of Endorsements and Testimonials in Advertising.” Disclosure of Material Connection: I received one or more of the products or services mentioned above for free in the hope that I would mention it on my blog. Regardless, I only recommend products or services I use personally and believe will be good for my readers. I am disclosing this in accordance with the Federal Trade Commission’s 16 CFR, Part 255: “Guides Concerning the Use of Endorsements and Testimonials in Advertising.” Disclosure of Material Connection: This is a “sponsored post.” The company who sponsored it compensated me via a cash payment, gift, or something else of value to write it. Regardless, I only recommend products or services I use personally and believe will be good for my readers. I am disclosing this in accordance with the Federal Trade Commission’s 16 CFR, Part 255: “Guides Concerning the Use of Endorsements and Testimonials in Advertising.”
This post contains affiliate links.

I think the one place in my house that get's trashed quickly is my patio. I'm sad to say it, but it inevitably does. I feel like it looks good for one year, and then the next it gets neglected. Then the following year I make it decent again, and neglected...you get the drift. I decided it was finally time to completely update it. My patio is quite large, almost 40' long, so I'm going to break this into parts otherwise you will be in photo overload :) Plus, they are two different completely areas anyway. Kind of like a dining room and living room. 

I'm going to start with the 'living room' section since that's the part I've been teasing and promising for awhile! Can you believe that it's just barely been good enough weather to get some pics out here? Between the crazy wind and rain, I'm done! I want summer!  
These chairs have been around for quite some time now. I'm actually surprised they lasted this long! They were a clearance find at a local grocery store (yes!) 10 years ago. Oh goodness and have they've seen some changes. They started off brown and green, then the sun turned the cushions purple. Weird. Then I tried some cheap ways to cover them. I then painted the frames two years ago a navy. I decided to go more neutral this year and get completely new cushions that will last! Here's a pic from a long time ago of them: 
I could show you all the iterations, but I won't :) If you really care, just search for "patio" or "porch" in the upper left corner :) 

Back to my current patio...as you can tell, I kind of went with a boho theme out here. This rug inspired everything. I found it at Home Goods. My other rug, which I looooved, got all ripped up from the elements over the past years. I was so sad to see it go, but realized that spending $200 on a rug every two years wasn't good, so I kept it smaller this year just in case. I could easily do $50 every two years....not $200.

 I added this macrame dream catcher here, because, why not? I just loved the look. You'll notice in my next post, I added more macrame to the other section of this patio :)
 The pillows are from Better Homes & Gardens. The texture of them is perfect! 
 I have become quite the weird plant lady these days. Some of them are still green and growing....somehow! I found these rattan lanterns at a local store on clearance. $7 for this one! I faux-aged these terracotta pots also, and this X table was a clearance find from Hobby Lobby.

 I wanted to get a new coffee table for this area. The set came with one, which is in good condition....just super small and in need of a good sanding and paint job. The past few years, we had our fire pit out here...had to move it every time so it wouldn't ruin the rug. It was a big pain in the butt. Plus, ours rusted out this year....so, yay! New table for me :) I wanted to go a little out of the box, and found this half wine barrel planter at Home Depot. I simply flipped it over, and voila! 
 I usually have plants on here and iced drinks! 
 My umbrella stand was super hideous, so I took some wood and covered it (you can see the tutorial here).
Covering it gave me another place to put stuff! This big lantern was a steal from Burlington. The #7 buoy is from Hobby Lobby.
 I just love this angle. These curtains are for privacy and a sun blocker. I made this whole contraption a few years ago and haven't looked back. Not only do they work well for both the privacy and sun, but they just add the perfect interest and border for the patio. (tutorial here)
 I ended up throwing out the smaller table that was here before, and decided to go a little unconventional again, and made this cut log into one. 
 Here's another look at the space. Pretty much everything has changed in here since you last saw it except the frames of the chairs! 
Here's a good crappy before from a few years ago:

 I just love hanging out here now. It's so inviting. I actually just installed misters along the curtain rod for those hot days! (which I have only had to use once so far! Ugh.. again..summer better get here soon and stay!)

Here's a sneak peak at the other portion of my patio which I'll share with you next week! Eek!


Follow me on my social for sneak peaks, live videos, and fun new things that are going on!

Disclosure of Material Connection: Some of the links in the post above are “affiliate links.” This means if you click on the link and purchase the item, I will receive an affiliate commission. Regardless, I only recommend products or services I use personally and believe will add value to my readers. I am disclosing this in accordance with the Federal Trade Commission’s 16 CFR, Part 255: “Guides Concerning the Use of Endorsements and Testimonials in Advertising.” 
THIS POST CONTAINS AFFILIATE LINKS.

The light fixtures in my house aren't bad. They could definitely be worse. I actually don't mind them too much. I've only switched one fixture because we needed a fan. I bought a beaded chandelier to put in my dining room, but decided that I might want to have it in my front room. Mainly because I didn't think the current one in my dining room is half bad. I did want to update it and give a new look though.  
DIY Farmhouse chandelier. Change any chandelier into a farmhouse chandelier. How to makeover your chandelier. Farmhouse decor and decorating ideas. Dining room decor. Dining room chandelier.

DIY Farmhouse chandelier. Change any chandelier into a farmhouse chandelier. How to makeover your chandelier. Farmhouse decor and decorating ideas. Dining room decor. Dining room chandelier.
This was a super simple project. It took just a couple of minutes, and made me happy enough with my current chandelier to keep it in place....well, for the time being anyway :) 
DIY Farmhouse chandelier. Change any chandelier into a farmhouse chandelier. How to makeover your chandelier. Farmhouse decor and decorating ideas. Dining room decor. Dining room chandelier.
First step was to take off the shades.  I then made sure that every light was a flame tipped candle light to give it a more authentic look.  
DIY Farmhouse chandelier. Change any chandelier into a farmhouse chandelier. How to makeover your chandelier. Farmhouse decor and decorating ideas. Dining room decor. Dining room chandelier.
 Next, I strung some beads along a jute rope. I used these beads in 3/4 inch from Amazon. The size of the whole thing once finished was about 60"; 12" for each section. 
DIY Farmhouse chandelier. Change any chandelier into a farmhouse chandelier. How to makeover your chandelier. Farmhouse decor and decorating ideas. Dining room decor. Dining room chandelier.
 I then looped it around the chandelier. I tied the ends together and trimmed the rope so you couldn't see it anymore. I tried the best that I could that each little 'loop' was the same height. 
DIY Farmhouse chandelier. Change any chandelier into a farmhouse chandelier. How to makeover your chandelier. Farmhouse decor and decorating ideas. Dining room decor. Dining room chandelier.
 And that's it! I didn't do this, but you could go a step further and paint the chandelier to give it an even more drastic change. 
DIY Farmhouse chandelier. Change any chandelier into a farmhouse chandelier. How to makeover your chandelier. Farmhouse decor and decorating ideas. Dining room decor. Dining room chandelier.
I love simple projects like this that make you happy with what you have without having to go and buy something new :) ....even though I already did, ha! But that's now going in my front room as I mentioned above. Can't wait to get it in there! 

Pin for later:
DIY Farmhouse chandelier. Change any chandelier into a farmhouse chandelier. How to makeover your chandelier. Farmhouse decor and decorating ideas. Dining room decor. Dining room chandelier.


Disclosure of Material Connection: Some of the links in the post above are “affiliate links.” This means if you click on the link and purchase the item, I will receive an affiliate commission. Regardless, I only recommend products or services I use personally and believe will add value to my readers. I am disclosing this in accordance with the Federal Trade Commission’s 16 CFR, Part 255: “Guides Concerning the Use of Endorsements and Testimonials in Advertising.”

When a magazine emails you about your house being featured in one of their issues, you do all the projects you planned to do in the past years in under a week :) That's just what you do...or at least what I did. I imagine that is what most would do. One of the projects I have been putting off doing is the wall along my staircase. I just couldn't make up my mind on what to do. I had three options, two of which were super hard and had me teetering on a ladder on the staircase. The other option was simple and quick, but just not what I had really wanted. So, since I had like 2.2 seconds to get this project done, guess which one I picked? The easy one! And I'm so glad I did it. I just wish I had done it years ago.


The poor wall along the stairs had been completely neglected. This wall was just a huge blank eyesore. It doesn't help that the entry way is a two story entry, so it's just lots and lots of beige everywhere. Here's a few before pictures below. If you look really closely you can see all the dings and horribleness of it all :) I'm pretty sure that spot in the middle is where my pup chewed. Yeah. ...

DIY board and batten staircase makeover. DIY stair makeover. How to hang board and batten on stairs. Staircase board and batten tutorial. Staircase ideas. Entry way decor and decorating ideas. Staircase decor and decorating ideas. Two story entryway ideas. Two story entry way ideas.
I always wanted to hang pictures on here or something, but never got around to doing it. 

Here's the much improved after:

DIY board and batten staircase makeover. DIY stair makeover. How to hang board and batten on stairs. Staircase board and batten tutorial. Staircase ideas. Entry way decor and decorating ideas. Staircase decor and decorating ideas. Two story entryway ideas. Two story entry way ideas.
 Before...again:
DIY board and batten staircase makeover. DIY stair makeover. How to hang board and batten on stairs. Staircase board and batten tutorial. Staircase ideas. Entry way decor and decorating ideas. Staircase decor and decorating ideas. Two story entryway ideas. Two story entry way ideas.
 After:
DIY board and batten staircase makeover. DIY stair makeover. How to hang board and batten on stairs. Staircase board and batten tutorial. Staircase ideas. Entry way decor and decorating ideas. Staircase decor and decorating ideas. Two story entryway ideas. Two story entry way ideas.

So, the first step in doing this was deciding how far apart I wanted the slats and how tall. I already knew I wanted to use 2.5" mdf boards for the vertical pieces and 3.5" for the top ones. I decided to do every other step for the slats. So, this made them 18" apart. Next, I found the angle of the stairs and cut the mdf to that angle on the top and bottom. I secured these to the wall using 2" nails with my nail gun.

DIY board and batten staircase makeover. DIY stair makeover. How to hang board and batten on stairs. Staircase board and batten tutorial. Staircase ideas. Entry way decor and decorating ideas. Staircase decor and decorating ideas. Two story entryway ideas. Two story entry way ideas.
 Next was trying to find that angle for the top pieces. I cut an approximate size of the horizontal piece (the area at the top landing and bottom landing). I placed this level where I wanted it to hang. I then drew a line along the top and bottom of this piece onto the wall.
DIY board and batten staircase makeover. DIY stair makeover. How to hang board and batten on stairs. Staircase board and batten tutorial. Staircase ideas. Entry way decor and decorating ideas. Staircase decor and decorating ideas. Two story entryway ideas. Two story entry way ideas.
 Next, was doing the same thing for the angled top piece. I placed the piece onto the vertical slats going up the stairs to give the me the correct angle that it was going to hang. I then pulled it down past the marks I made for the horizontal board. I drew lines on this one as well.
DIY board and batten staircase makeover. DIY stair makeover. How to hang board and batten on stairs. Staircase board and batten tutorial. Staircase ideas. Entry way decor and decorating ideas. Staircase decor and decorating ideas. Two story entryway ideas. Two story entry way ideas.
 This is what the wall looked like to give you a better idea of what I just did :) As for the angle cuts, I placed a mark on each molding piece where the other piece intersected it on the top and bottom. I then took off the molding and connected these dots with a line. This gave me the angle for each piece.
DIY board and batten staircase makeover. DIY stair makeover. How to hang board and batten on stairs. Staircase board and batten tutorial. Staircase ideas. Entry way decor and decorating ideas. Staircase decor and decorating ideas. Two story entryway ideas. Two story entry way ideas.
 Here's the angle for this horizontal piece.
DIY board and batten staircase makeover. DIY stair makeover. How to hang board and batten on stairs. Staircase board and batten tutorial. Staircase ideas. Entry way decor and decorating ideas. Staircase decor and decorating ideas. Two story entryway ideas. Two story entry way ideas.
 And then the other piece connected to it. I did the same thing for the top landing also.
DIY board and batten staircase makeover. DIY stair makeover. How to hang board and batten on stairs. Staircase board and batten tutorial. Staircase ideas. Entry way decor and decorating ideas. Staircase decor and decorating ideas. Two story entryway ideas. Two story entry way ideas.


DIY board and batten staircase makeover. DIY stair makeover. How to hang board and batten on stairs. Staircase board and batten tutorial. Staircase ideas. Entry way decor and decorating ideas. Staircase decor and decorating ideas. Two story entryway ideas. Two story entry way ideas.
 When all the molding was secured to the wall, I then went through and painted it with Swiss Coffee by Behr in a satin finish. I finished it off with some light weight spackling compound, filling in the holes, lines and gaps.
DIY board and batten staircase makeover. DIY stair makeover. How to hang board and batten on stairs. Staircase board and batten tutorial. Staircase ideas. Entry way decor and decorating ideas. Staircase decor and decorating ideas. Two story entryway ideas. Two story entry way ideas.
I did this all within a day, you guys...like 12 hours. Yes. It started at night, worked until about 1 am and then finished with a final coat of paint in the morning.
DIY board and batten staircase makeover. DIY stair makeover. How to hang board and batten on stairs. Staircase board and batten tutorial. Staircase ideas. Entry way decor and decorating ideas. Staircase decor and decorating ideas. Two story entryway ideas. Two story entry way ideas.
Here's another before picture:
DIY board and batten staircase makeover. DIY stair makeover. How to hang board and batten on stairs. Staircase board and batten tutorial. Staircase ideas. Entry way decor and decorating ideas. Staircase decor and decorating ideas. Two story entryway ideas. Two story entry way ideas.
And the after. It's amazing how much this space transformed with just a little paint and molding. My stairs even look cleaner! ha!
DIY board and batten staircase makeover. DIY stair makeover. How to hang board and batten on stairs. Staircase board and batten tutorial. Staircase ideas. Entry way decor and decorating ideas. Staircase decor and decorating ideas. Two story entryway ideas. Two story entry way ideas.
It took me some time to figure out what to put as my decor above the board and batten until I realized what a plethora of mirrors I had in storage. I actually have about 10 more mirrors just decided to try to keep it simple :)
DIY board and batten staircase makeover. DIY stair makeover. How to hang board and batten on stairs. Staircase board and batten tutorial. Staircase ideas. Entry way decor and decorating ideas. Staircase decor and decorating ideas. Two story entryway ideas. Two story entry way ideas.
  One of my problems with deciding on how to do the molding on this section of the wall came from what would go with the square board and batten molding at the bottom of it. I couldn't find any inspiration pictures to go off of so I had no clue if the square board and batten would jive with just horizontal board and batten. But, I think it totally works!
DIY board and batten staircase makeover. DIY stair makeover. How to hang board and batten on stairs. Staircase board and batten tutorial. Staircase ideas. Entry way decor and decorating ideas. Staircase decor and decorating ideas. Two story entryway ideas. Two story entry way ideas.

This brightened up my entry way also. This poor wall at the bottom of the stairs had been so tired looking and abused by the use of baby gates.

DIY board and batten staircase makeover. DIY stair makeover. How to hang board and batten on stairs. Staircase board and batten tutorial. Staircase ideas. Entry way decor and decorating ideas. Staircase decor and decorating ideas. Two story entryway ideas. Two story entry way ideas.
I moved into this house hating the knotty alder finishes. I wanted to paint or stain all of it. A few years ago I realized I didn't hate it, it just looked horrible against the beige. Updating my staircase with the white paint has made the wood pop and look amazing! I am so so glad I lived with it for years and never painted it.
DIY board and batten staircase makeover. DIY stair makeover. How to hang board and batten on stairs. Staircase board and batten tutorial. Staircase ideas. Entry way decor and decorating ideas. Staircase decor and decorating ideas. Two story entryway ideas. Two story entry way ideas.
 Next project for this area....which will be way down the road when my kids are a little older...I'll be pulling up this carpet off the stairs. I have always envisioned staining it darker to match our wood floors, but now I'm afraid that would take away from the banister. So....I'm thinking white steps are in the near future :) Maybe I'll add a runner so I can do it sooner than later :)
DIY board and batten staircase makeover. DIY stair makeover. How to hang board and batten on stairs. Staircase board and batten tutorial. Staircase ideas. Entry way decor and decorating ideas. Staircase decor and decorating ideas. Two story entryway ideas. Two story entry way ideas.
This area has taking on such a transformation since we moved in here 10 years ago. Here's a picture of this space before:
DIY board and batten staircase makeover. DIY stair makeover. How to hang board and batten on stairs. Staircase board and batten tutorial. Staircase ideas. Entry way decor and decorating ideas. Staircase decor and decorating ideas.
New floors, paint and molding. Simple (ish) changes for a big change! See how bad that knotty alder looks with the beige?

If you walk through my house we will see I have a love for board and batten. Here are some tutorials on all the ways I've done them. 

My bedroom:
DIY board and batten tutorials. Square board and batten. Board and batten in bedroom. Ideas for big walls Vaulted ceiling wall ideas. Board and batten tutorial

Small bathroom:

DIY board and batten tutorials. How to install board and batten. Board and batten in bathroom. Ideas for big walls. Board and batten tutorial
Guest bathroom:
DIY board and batten tutorials. How to install board and batten. Board and batten in bathroom. Ideas for big walls. Board and batten tutorial
Nursery:
DIY board and batten tutorials. Board and batten in nursery. Ideas for big walls. Board and batten tutorial


Hallway:

DIY board and batten tutorials. Square board and batten. Board and batten in entryway. Ideas for big walls. Ideas for staircases. Board and batten tutorial

Kitchen Island
Board and batten kitchen island makeover. How to update your kitchen island. DIY kitchen island update. Two toned kitchen cabinets. White and wood kitchen cabinet ideas. Knotty alder kitchen cabinets.