This post contains affiliate links.
Heyhey! If you are just joining me, I just celebrated my 10 year blogging anniversary (blogiversary, as some would say). In celebration, I am walking down memory lane this week. Each day I'll be sharing a room in my house and all the crazy transformations it's been through throughout the years. So, I hope you come along and laugh with me at some of my decorating blunders :)
Today, I'm sharing my front room. I used to tease that this room changed more times in a year than months. It was like ever evolving for awhile. I just couldn't quite get my decor perfect, and wasn't happy with anything. Well, I'm happy to say, it has only seen small seasonal changes since last year's mantel upgrade. And before that, it sat around the same for at least a couple of years.
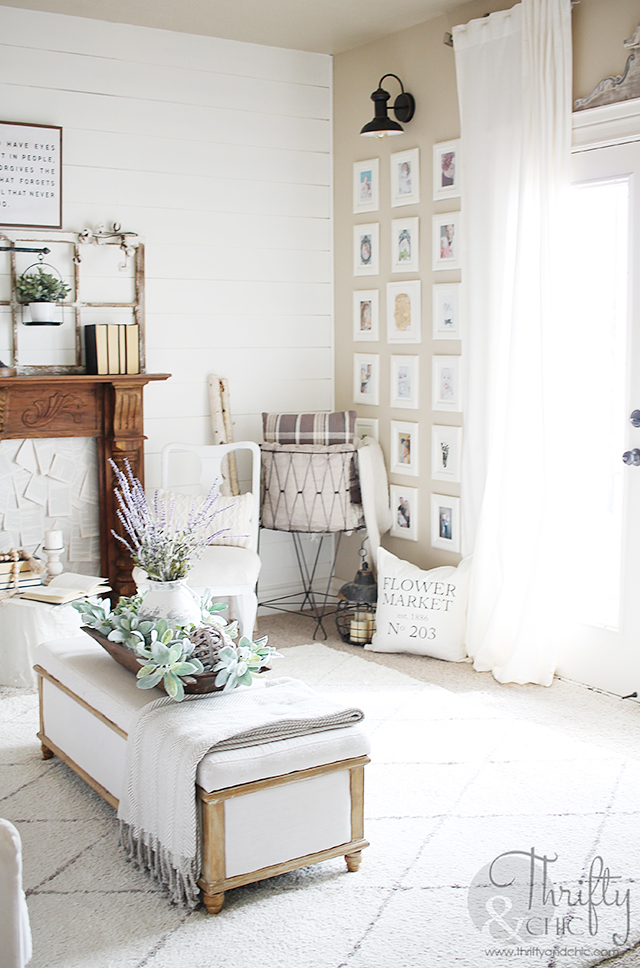
Here's how my front living room looks now:


 2009
And it all started off like this:
 Why a took a picture of this, I have no clue. haha :) When we moved into our house just over 10 years ago, we didn't have enough furniture to furnish all the rooms. We came from a 1 bedroom 600 square foot apartment. So, moving into a 3500 square foot house was quite the jump. We were on a strict budget, so most of my rooms sat empty for some time before I started doing some DIY projects to furnish them....and that is how and why I started this blog! (In case you didn't know :) )
Our first purchase for our house was our sectional that is currently in our main living room. So, when we bought that, we were able to move this couch in the front room. I was pretty excited about actually having some furniture in here besides a chest. We scored this couch for $90 at a discount warehouse... I know, right?!
 I thrifted that side table for $10, and found the large mirror for $10 online. I of course decorated with other odds and ends to make it feel more decorated.
 I thought it was ingenious to use plant stands for side tables. I couldn't afford larger tables, so when I found these for like $12 each, I snatched them up and used them as side tables. Little did I know back then that I could have made a cute table for the same price out of wood!

2010
A little after that, I thought it would be fun to try the sectional in here. You should have seen us trying to move it and the couch through our tight little entryway. I'm surprised we didn't ding up the wall more than we did! That mirror was another find for $10 and the ottoman from the same place for $30. Actually, the sectional was from the same store too, RC Willey. They used to have these whacky Wednesday Web deals that they would deeply discount things. All you had to do was pick it up at one of their stores. I actually get asked about my sectional a lot. It was a labor day deal that we snatched up. They no longer carry it though. We are still using it 10 years later and it's in awesome condition!
I also updated the light in this picture with some vinyl. I loved the look!

In this pic below, I realized how much bigger the room felt when hanging curtains to the ceiling. I didn't have long enough curtains to do so. So, I just sewed on a bottom to match the pillows and runner. I also painted the older mirror that was in here. This was the start of me turning lots of things white!
 A little later, I had a fun idea to flip the sectional. I actually loved this look, but it cut off the entry to the room too much.
 So, I moved it back and then created some free wall art. I was trying to find my style at this point. I loved color, but hated it when I actually used it. I was always drawn towards a neutral pallet.
 2011
I then updated my curtains with burlap. This was when shabby chic was definitely starting to take hold and everything was chippy and burlap. I also made this wood sunburst mirror for the space.

2012
And then, you can see here I started to take color out of everything. This is when my husband started to hate my decorating :) I was totally into the all white Scandinavian vibe, but didn't dare paint my whole house white. So, I just kept color out of it instead.

I made these curtains to give this space a little more character. They are actually white and brown burlap sewn together. I forget how much I loved these. I should put them back in here!

2013
My style quickly changed to coastal. With that, I made my planked wall. This was done way before farmhouse was a popular thing. I love the planked walls in old coastal houses, so I decided that was direction I wanted to go in with this room. Plus, it gave me a white wall!

2014
I decided to move out the sectional at this point, and bring my other couch back in. I was able to create a little office space in that corner (that I used about twice) :) I also added my tree stump coffee table in here.

I always had a problem finding something to put on this wall. This was one of my attempts at adding pictures and trying to take up a lot of space!
 2015
Then came my weird transition between coastal and farmhouse and liking color but not wanting to use any :) Blue was my go to color if I did want to have an accent piece. I made the chevron arrows to take up space along the long wall above the couch. I also made this table for the planked wall. I purchased this sideboard to create more storage space for the room. That's what I hate about this house...lack of storage space. No closets besides in the bedroom. No coat closet, linen closet,...nothing.

I continued my gallery wall at this point also. Each of my kids have a gallery wall dedicated to them. It's funny because for a few years after we moved in, it drove my husband nuts that we didn't have any pictures on the walls. I then had my babies....and well, now I probably have waaaay to many pictures hanging up :)


2016
Then came my big transition with this room. It was no longer just a front living room that barely got used. It needed to do double duty as a guest room and even house some of the toys. I changed out the sofa for a sleeper sofa from Ikea. I also switched out the rug for a larger one, and bought a bench to act as a coffee table. This bench concealed all the extra kitchen toys for the play kitchen that was in the corner (out of picture).


2017
Smaller changes have happened since then. Mainly trying to find some decor that I loved to fit above the couch. I also made that ladder in place of the welcome sign. This was my big step to "farmhouse" this room up. Literally! haha :)

 Current
My next big move last year was this vintage mantel. I also moved the sunburst mirror back in here (talk about full circle!). Now only seasonal changes happen in here. I am so completely in love with this room!
Bonus....did you know that one point in time I actually had this room stages as an actual bedroom? I know! Right?

This room also did double duty as a lot of backdrops for my photography hobby. The white planked background was always so perfect!
Well, I hope you enjoyed the walk down memory lane with this room and all it's changes! It's amazing how styles change and how outside influences can affect it. I remember many of times where I wanted to have my house look like someone else's and I tried to fit that mold and would end up hating it. It's better to let your style evolve into something you love. I haven't changed my house for awhile now and it used to be I would change it every month! It took a bit to get there, but it was totally worth it. I love my house more now that I ever did in the past.
Be sure to stay connected so you don't miss on my next room tour!


Disclosure of Material Connection: Some of the links in the post above are “affiliate links.” This means if you click on the link and purchase the item, I will receive an affiliate commission. Regardless, I only recommend products or services I use personally and believe will add value to my readers. I am disclosing this in accordance with the Federal Trade Commission’s 16 CFR, Part 255: “Guides Concerning the Use of Endorsements and Testimonials in Advertising.”
Heyhey! If you are just joining me, I just celebrated my 10 year blogging anniversary (blogiversary, as some would say). In celebration, I am walking down memory lane this week. Each day I'll be sharing a room in my house and all the crazy transformations it's been through throughout the years. So, I hope you come along and laugh with me at some of my decorating blunders :)
Today, I'm sharing my front room. I used to tease that this room changed more times in a year than months. It was like ever evolving for awhile. I just couldn't quite get my decor perfect, and wasn't happy with anything. Well, I'm happy to say, it has only seen small seasonal changes since last year's mantel upgrade. And before that, it sat around the same for at least a couple of years.
Here's how my front living room looks now:

Wood Sunburst Mirror: Tutorial Farmhouse Ladder: Tutorial Wire Hamper: Amazon Bench: Target Console Table: Target Sofa Bed: Ikea Bench: Target Rug: Rugs USA

And it all started off like this:

Our first purchase for our house was our sectional that is currently in our main living room. So, when we bought that, we were able to move this couch in the front room. I was pretty excited about actually having some furniture in here besides a chest. We scored this couch for $90 at a discount warehouse... I know, right?!

2010
A little after that, I thought it would be fun to try the sectional in here. You should have seen us trying to move it and the couch through our tight little entryway. I'm surprised we didn't ding up the wall more than we did! That mirror was another find for $10 and the ottoman from the same place for $30. Actually, the sectional was from the same store too, RC Willey. They used to have these whacky Wednesday Web deals that they would deeply discount things. All you had to do was pick it up at one of their stores. I actually get asked about my sectional a lot. It was a labor day deal that we snatched up. They no longer carry it though. We are still using it 10 years later and it's in awesome condition!
I also updated the light in this picture with some vinyl. I loved the look!
I then updated my curtains with burlap. This was when shabby chic was definitely starting to take hold and everything was chippy and burlap. I also made this wood sunburst mirror for the space.

And then, you can see here I started to take color out of everything. This is when my husband started to hate my decorating :) I was totally into the all white Scandinavian vibe, but didn't dare paint my whole house white. So, I just kept color out of it instead.


My style quickly changed to coastal. With that, I made my planked wall. This was done way before farmhouse was a popular thing. I love the planked walls in old coastal houses, so I decided that was direction I wanted to go in with this room. Plus, it gave me a white wall!

I decided to move out the sectional at this point, and bring my other couch back in. I was able to create a little office space in that corner (that I used about twice) :) I also added my tree stump coffee table in here.


Then came my weird transition between coastal and farmhouse and liking color but not wanting to use any :) Blue was my go to color if I did want to have an accent piece. I made the chevron arrows to take up space along the long wall above the couch. I also made this table for the planked wall. I purchased this sideboard to create more storage space for the room. That's what I hate about this house...lack of storage space. No closets besides in the bedroom. No coat closet, linen closet,...nothing.


The next big change in here was creating my faux fireplace. I wanted another place to hang stockings during the winter. Plus, I thought this would be perfect for a great focal point.

Then came my big transition with this room. It was no longer just a front living room that barely got used. It needed to do double duty as a guest room and even house some of the toys. I changed out the sofa for a sleeper sofa from Ikea. I also switched out the rug for a larger one, and bought a bench to act as a coffee table. This bench concealed all the extra kitchen toys for the play kitchen that was in the corner (out of picture).


2017
Smaller changes have happened since then. Mainly trying to find some decor that I loved to fit above the couch. I also made that ladder in place of the welcome sign. This was my big step to "farmhouse" this room up. Literally! haha :)


My next big move last year was this vintage mantel. I also moved the sunburst mirror back in here (talk about full circle!). Now only seasonal changes happen in here. I am so completely in love with this room!
Wood Sunburst Mirror: Tutorial Farmhouse Ladder: Tutorial Wire Hamper: Amazon Bench: Target Console Table: Target Sofa Bed: Ikea Bench: Target Rug: Rugs USA

Well, I hope you enjoyed the walk down memory lane with this room and all it's changes! It's amazing how styles change and how outside influences can affect it. I remember many of times where I wanted to have my house look like someone else's and I tried to fit that mold and would end up hating it. It's better to let your style evolve into something you love. I haven't changed my house for awhile now and it used to be I would change it every month! It took a bit to get there, but it was totally worth it. I love my house more now that I ever did in the past.
Be sure to stay connected so you don't miss on my next room tour!
Follow me on my social for sneak peaks, live videos, and fun new things that are going on!
Disclosure of Material Connection: Some of the links in the post above are “affiliate links.” This means if you click on the link and purchase the item, I will receive an affiliate commission. Regardless, I only recommend products or services I use personally and believe will add value to my readers. I am disclosing this in accordance with the Federal Trade Commission’s 16 CFR, Part 255: “Guides Concerning the Use of Endorsements and Testimonials in Advertising.”


