porch etiketine sahip kayıtlar gösteriliyor. Tüm kayıtları göster

On the few days that the weather has cooperated...and I mean very few...I've had the chance to spruce up my patio...which usually follows by me sprinting inside to hide from the wind, rain, and lightning.  My patio became pretty drab over the winter. So, I decided to change it up a bit starting with this little project...my patio umbrella stand. Even though this was just on a whim project, and literally took me 10 minutes to do, I felt like it made a huge impact on this area.
 This is how it used to look. It's heavy as heck and made of granite. I think 40 or 50 pounds, and wouldn't you know that our winds still blow the thing over. Anyway, I got this one because it was the most sturdy one out there. I never cared for how it looked though.
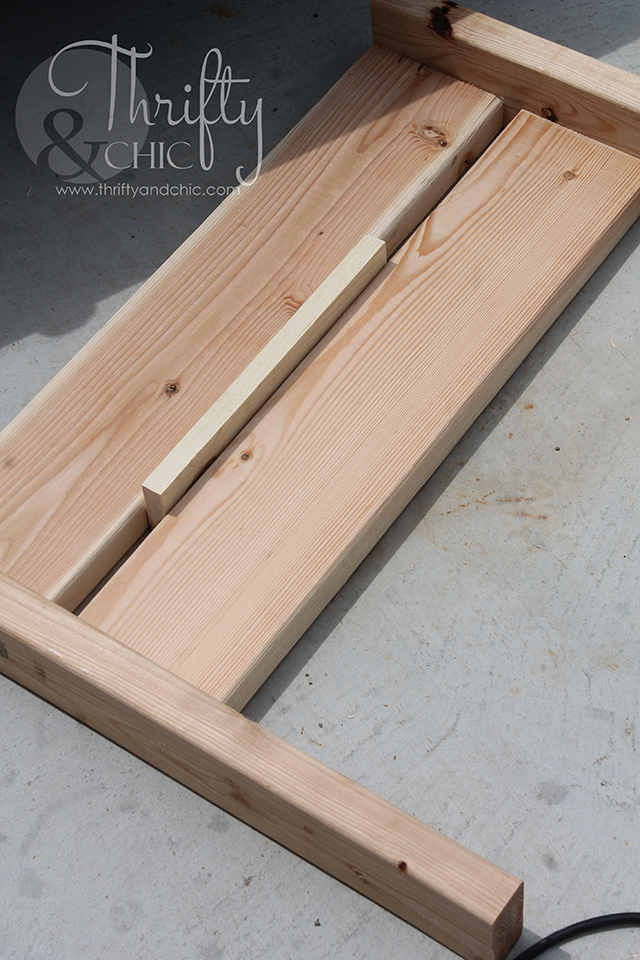
 So, I decided to create a little box for it. My first step was to use 4 pieces of 2x4s, and case it in. The diameter of this stand is 18", so my 2x4s were two at 22" and two at 19". The 19" pieces sat inside the 22" pieces. I secured these with 2 1/2" screws.
 I then cut some scrap would 1x4s to go over the top. These were all cut at 22". The middle section was a little smaller than a 1x4, so I did some digging and found some 1x3s. I cut these to fit pretty close to the vertical part of the stand, but enough that it could come off if needed.
 Since these 1x3 pieces were only going to be connected on one end each, to prevent them from sagging, I added a scrap piece of 1x3 to the bottom portion so that it can rest on the granite. I secured all the top pieces of wood with 1 1/4" nails.
I then stained the entire piece Dark Walnut by Minwax.
 Besides hiding a complete eyesore, this gives a great extra place to add some patio decor. I was really have a problem with placement of that bamboo lantern, and now it fits on here perfectly!
 Here's a little sneak peak at more of the patio which I'll be sharing with you all next week....if it ever does stop raining. I'm telling you, 40 degrees in May is not cool... I feel like we are in the beginning of March. I want my hot temps back! So, weather depending...I'll show you the rest of this area with sources :) I also have big plans for the opposite side of this patio, which I can't wait to get started on!
PIN FOR LATER:


The below post contains affiliate links.

I'm not sure what to really call this thing. It's like a door, but miniature. Heavy like a door for sure :)  I'm just using it on my porch, but there are a ton of different ways you can display it and put it in your house. I found something similar to this at a vintage sale I went a few months back, and they were asking gobs of money for it, like $130. Yeah. It was so cute, me and my friend had to make one for ourselves. We made both of ours for about $16 each...minus the wreath and bow. So, total, maybe in the low $20s.
DIY Farmhouse barn door porch decor. Vintage door decor for your porch. Porch decor and decorating ideas.

I've been loving my porch this past year ever since I redecorated it and thought this would be the perfect addition.

The supplies I used:
1 piece of bead board cut at 18x32" (I bought a 32"x48"' piece and cut mine to size)
1 piece of 1/4" plywood 18x24" (I bought a 2x4' piece and cut it to size)
2 - 2x4s miter cut so the longest side is 57"
2 - 2x4s miter cut so the longest side is 23.5"
1 - 2x4 cut at 16.5"
Nail gun/ 1" nails
1" screws
Mending plates
Paint
Java glaze
Vinyl "welcome" (got mine from the Silhouette store)
Ribbon or bow
Hanger
Wreath

First step: If you didn't have the lumber store cut your wood yet, do that. I used my Dremel Ultra Saw to cut both my bead board and plywood to size.
DIY Farmhouse barn door porch decor. Vintage door decor for your porch. Porch decor and decorating ideas.

DIY Farmhouse barn door porch decor. Vintage door decor for your porch. Porch decor and decorating ideas.
 I then lined up the bead board and plywood on the ground and left a little gap in the middle. I measured the length of the two boards first and made that the longest length of the two side 2x4s (57"). I then placed those together an decided on the width of the top and bottom boards. (that's where I got the measurements from above) I made sure my 2x4s overlapped the plywood and bead board by about an inch on the sides.
DIY Farmhouse barn door porch decor. Vintage door decor for your porch. Porch decor and decorating ideas.
 Once the boards were cut, I laid them on a flat surface and squared them.
DIY Farmhouse barn door porch decor. Vintage door decor for your porch. Porch decor and decorating ideas.
 I then used mending plates to secure all of them together. You can also use wood glue and a 2" screw through the side to help it stay secure.
DIY Farmhouse barn door porch decor. Vintage door decor for your porch. Porch decor and decorating ideas.
 I then measured the middle section and cut out the middle 2x4 to fit, which was 16.5". At his point, I also measured about 22" down from the top on both sides and placed the top of my 2x4 on these points. I didn't do this until I realized I needed to at the end, but at this point, use mending plates to secure the 2x4 middle section to the sides.
DIY Farmhouse barn door porch decor. Vintage door decor for your porch. Porch decor and decorating ideas.
 I placed the plywood on the top and secured it in place using my nail gun.
DIY Farmhouse barn door porch decor. Vintage door decor for your porch. Porch decor and decorating ideas.
 I then placed the bead board on the bottom and secure that too. At this point, I decided to secure the corners with the screws to give it more stability.
DIY Farmhouse barn door porch decor. Vintage door decor for your porch. Porch decor and decorating ideas.
 Now that it was all together, I painted it with some white latex paint.
DIY Farmhouse barn door porch decor. Vintage door decor for your porch. Porch decor and decorating ideas.
 I decided to give it a little wear and distressed the edges and some of the wood with sandpaper.
DIY Farmhouse barn door porch decor. Vintage door decor for your porch. Porch decor and decorating ideas.
 I used some glaze on the edges and in the middle part on the bead board.
DIY Farmhouse barn door porch decor. Vintage door decor for your porch. Porch decor and decorating ideas.

DIY Farmhouse barn door porch decor. Vintage door decor for your porch. Porch decor and decorating ideas.
 I made my bow and secured it to the center of the middle 2x4. I also added the hanger on the bead board for my wreath.
DIY Farmhouse barn door porch decor. Vintage door decor for your porch. Porch decor and decorating ideas.
 I chose this "welcome" from the Silhouette design store and cut it out with my Silhouette. I used some transfer tape to place it on the board.
DIY Farmhouse barn door porch decor. Vintage door decor for your porch. Porch decor and decorating ideas.
 And here it is all done!
DIY Farmhouse barn door porch decor. Vintage door decor for your porch. Porch decor and decorating ideas.

 You can't see it very well on my porch from this angle, but I think it added the perfect 'welcoming' touch :)
DIY Farmhouse barn door porch decor. Vintage door decor for your porch. Porch decor and decorating ideas.
 I did end up scrunching up the bow a little bit to give it more bounce. I wasn't too happy with the rigidity of it before.
DIY Farmhouse barn door porch decor. Vintage door decor for your porch. Porch decor and decorating ideas.
 The wreath I got from Hobby Lobby. I don't recall how much that cost, but I know they still carry it (at least as of me writing this post :) ).
DIY Farmhouse barn door porch decor. Vintage door decor for your porch. Porch decor and decorating ideas.
This porch has come a long way since this:
DIY porch decor and decorating ideas.
Yeah. It seriously looked like that, maybe worse for years :/ Nothing like a first impression coming into my house, huh? lol Sometimes things just tend to get neglected....which makes it that more fun to spruce them up! :)


pin for later:
DIY Farmhouse barn door porch decor. Vintage door decor for your porch. Porch decor and decorating ideas.

DIY Farmhouse barn door porch decor. Vintage door decor for your porch. Porch decor and decorating ideas.

Disclosure of Material Connection: Some of the links in the post above are “affiliate links.” This means if you click on the link and purchase the item, I will receive an affiliate commission. Regardless, I only recommend products or services I use personally and believe will add value to my readers. I am disclosing this in accordance with the Federal Trade Commission’s 16 CFR, Part 255: “Guides Concerning the Use of Endorsements and Testimonials in Advertising.”

I was provided product by DecoArt and compensated to write about this project, but all thoughts, opinions, and ideas are my own :)

Now that the weather is beautiful outside, I'm starting to spend more and more time outdoors on my porch. This is my go-to place all summer! And now that freezing temps are hopefully in the past, it's also time to start adding some beautiful flowers. Last year, I just used a plain terracotta pot for my porch flowers, but I wanted to spruce it up a little bit this year. 

DecoArt came out with a new paint pouring program, which is amazing! The possibilities are endless with these mediums! I wanted a cool paint dripping look with my pots, so I decided to see what it could do on terracotta! 


My first step was picking my colors. I used DecoArt Americana Acrylic Paint in Sea Glass and White Wash. I also used the DecoArt Pouring Medium.
Paint Pouring on terracotta pots. DIY patio or porch decor and decorating ideas
I followed the ratio suggestions on the back of the medium, and mixed equal parts of the Pouring Medium with the acrylic paints into a paper cup. If you want a different look, it would be at this point to mix both colors together in one cup, but I decided to do a different direct pour technique. 
Paint Pouring on terracotta pots. DIY patio or porch decor and decorating ideas
I ended up having enough paint to do two pots, so this is the first one. 
Paint Pouring on terracotta pots. DIY patio or porch decor and decorating ideas

I placed it upside down on some folded up tinfoil, which was also on top of my drop cloth. 
Paint Pouring on terracotta pots. DIY patio or porch decor and decorating ideas
For the first pour, I spooned over the White Wash along the bottom of the pot (technically the top now).
Paint Pouring on terracotta pots. DIY patio or porch decor and decorating ideas
I then spooned over the Sea Glass. I didn't know exactly how these would mix, so it was good to see some of the white coming through.
Paint Pouring on terracotta pots. DIY patio or porch decor and decorating ideas
I did have a few spots the paint didn't get, so I decided to spoon some more White Wash onto those spots and a little more on top to break up the Sea Glass.
Paint Pouring on terracotta pots. DIY patio or porch decor and decorating ideas
To dry, I placed the pots on top of a scrap piece of 4x4 wood. I took care drying these for some time since they were going to be in direct contact with water. I seriously waited about a good week. 
Paint Pouring on terracotta pots. DIY patio or porch decor and decorating ideas
While it was drying, I did grab some excess paint and painted about 2" in on the inside of the pot. You can wait to do this step once it's dried if you have more paint hanging around that won't go bad within that time.

At this point, you'll want to seal the pots with DecoArt's DuraClear Varnish if the pots are going to be outdoors.
Paint Pouring on terracotta pots. DIY patio or porch decor and decorating ideas
Here's the finished pot! I think it turned out so cool! 
Paint Pouring on terracotta pots. DIY patio or porch decor and decorating ideas


Paint Pouring on terracotta pots. DIY patio or porch decor and decorating ideas
The best thing about paint pouring, is that every time you do it, it's going to turn out different. Just check out the my other pot and how it turned out!
Paint Pouring on terracotta pots. DIY patio or porch decor and decorating ideas
Here's a look at the inside. I painted to about where I knew the soil would hit. 
Paint Pouring on terracotta pots. DIY patio or porch decor and decorating ideas
And here's where they ended up on my porch. I can't wait for more of those zinnias to bloom! Check out here for my full porch reveal and the tutorial on making these chairs.
Paint Pouring on terracotta pots. DIY patio or porch decor and decorating ideas
Be sure to check out DecoArt and their social media for more inspiration!
www.decoart.com
Facebook
Instagram
Pinterest


Disclosure of Material Connection: This is a “sponsored post.” The company who sponsored it compensated me via a cash payment, gift, or something else of value to write it. Regardless, I only recommend products or services I use personally and believe will be good for my readers. I am disclosing this in accordance with the Federal Trade Commission’s 16 CFR, Part 255: “Guides Concerning the Use of Endorsements and Testimonials in Advertising.”
Pin It
DIY outdoor porch or patio furniture. Learn how to make these chairs for about $20 each!  Porch and patio decor and decorating ideas

This was one of those projects that I did on a whim. I felt the building bug, I had 4 patio cushions that I got for a killer deal literally being blown in the wind off my back patio , and well, my porch looked like heck :) So, I found some plans that I loved, and built some chairs for my porch that would accommodate my cushions. These plans are from Ana White's modern outdoor chair plans. I had to modify them to fit my Threshold cushions I got from Target. They are super thick and not quite square like the original plans allowed for.

Here are my measurements and cuts:
4 - 2x4 @ 22.25" legs
6 - 2x6 @ 25.5" side slats
2 - 2x4 @ 28.5" arm rests
4 - 2x6 @ 22" front and back slats
1 - 2x4 @ 22" back top
2 - 2x2 @ 22.5" inside cleat
5 - 2x4 @ 22" side slats
DIY outdoor porch or patio furniture. Learn how to make these chairs for about $20 each!  Porch and patio decor and decorating ideas
Ana has amazing plans on how to build this which you can find here, but I'm going to share with you my simple tricks to make it easier and my modifications.

Step 1: Attached the 3 side slats per side into the 2x4 legs. You can't really do a kreg jig on these since you'll see them on one or the other side, so it's better to counter sink your screws. Since I lost my counter sink bit, I just used a drill bit that was a little larger than the head of my screws, which were 2 1/2" exterior deck screws. To make this easier, I drilled all the holes first. I lined up where the 2x6s would go with 3/4" in between them and then drilled 2 holes per 2x6 onto the 2x4.

DIY outdoor porch or patio furniture. Learn how to make these chairs for about $20 each!  Porch and patio decor and decorating ideas
 Step 2: Before attaching the 2x6's, you'll want to sand the edges now since it won't be easy to do at the end.
DIY outdoor porch or patio furniture. Learn how to make these chairs for about $20 each!  Porch and patio decor and decorating ideas
 Step 3: Attach one 2x6 side slat to the legs; flush with the top and one side. Use 2 1/2" screws and wood glue to secure. To make this part easier, I rested it against my fire pit.
DIY outdoor porch or patio furniture. Learn how to make these chairs for about $20 each!  Porch and patio decor and decorating ideas
 Step 4: Attach the next slat 3/4" away from the first one. I used a scrap piece of 1x3 to help with this.
DIY outdoor porch or patio furniture. Learn how to make these chairs for about $20 each!  Porch and patio decor and decorating ideas
 Step 5: Finish it up with a 3rd slat. Then do the other arm/leg set.
DIY outdoor porch or patio furniture. Learn how to make these chairs for about $20 each!  Porch and patio decor and decorating ideas
 Step 6: Now place the arm rests onto the top of the arm pieces. Counter sink screw and wood glue in place.
DIY outdoor porch or patio furniture. Learn how to make these chairs for about $20 each!  Porch and patio decor and decorating ideas
 Step 7: Now add the back slats. To do this, I stood up the arm pieces and slid two long 1x3s in the slats as show below. This helped balance the arms so they wouldn't fall over so easily. It also helped with resting the back slats in place so they are easier to screw into place.
DIY outdoor porch or patio furniture. Learn how to make these chairs for about $20 each!  Porch and patio decor and decorating ideas

DIY outdoor porch or patio furniture. Learn how to make these chairs for about $20 each!  Porch and patio decor and decorating ideas
 To do the bottom back slat and the front slat, I flipped the chair over and slide the 1x3 into the slat below to rest the 2x6 (just like the top pieces above).
DIY outdoor porch or patio furniture. Learn how to make these chairs for about $20 each!  Porch and patio decor and decorating ideas
 Step 8: Attach the back top piece. In this one, I put it flush with the back top slat. After looking at it, I decided to move it to be flush with the arm rests instead.
DIY outdoor porch or patio furniture. Learn how to make these chairs for about $20 each!  Porch and patio decor and decorating ideas
 Step 9: You can barely see the line, but I have the chair tipped upside down and measured the width of the 2x4 approx 1 3/4" up from the bottom of the bottom side slats. You'll see what I mean in the next few pictures (hopefully) :) You just want the seat cleat to sit low enough to fit the seat slats and not go above the bottom side slats when in an upright position.
DIY outdoor porch or patio furniture. Learn how to make these chairs for about $20 each!  Porch and patio decor and decorating ideas
 Here's the seat cleat, with the seat slat, sitting right for reference.
DIY outdoor porch or patio furniture. Learn how to make these chairs for about $20 each!  Porch and patio decor and decorating ideas
 Screw in the cleat on both sides of the arm pieces.
DIY outdoor porch or patio furniture. Learn how to make these chairs for about $20 each!  Porch and patio decor and decorating ideas
 Step 10: Place and screw the seat slats into the cleats.
DIY outdoor porch or patio furniture. Learn how to make these chairs for about $20 each!  Porch and patio decor and decorating ideas
 Step 11: Fill all holes with wood filler, cure, and sand.
DIY outdoor porch or patio furniture. Learn how to make these chairs for about $20 each!  Porch and patio decor and decorating ideas
 Step 12: Paint or stain, then finish with poly for durability.
DIY outdoor porch or patio furniture. Learn how to make these chairs for about $20 each!  Porch and patio decor and decorating ideas
 Here's a good look at the cushions. The top and bottom cushion together were only $10. I know, right?! Target was clearancing all their patio stuff back in May, and I just couldn't help get them even though I didn't need them. You CANNOT beat that price. So, they literally sat in my backyard ever since just becoming clutter. I'm so glad I made a place for them to live :)
DIY outdoor porch or patio furniture. Learn how to make these chairs for about $20 each!  Porch and patio decor and decorating ideas
 Here they are on my porch. They are definitely a more modern piece, but I just love them!
DIY outdoor porch or patio furniture. Learn how to make these chairs for about $20 each!  Porch and patio decor and decorating ideas
 Of course, anything would be better than what my porch looked like before :) My old patio set that I now have in my backyard was on this porch before. So, this porch was empty for awhile, and then I had company stay over, and I knew they would be using the porch since those doors open to that guest room. So, I ran to the store and bought the cheapest and nicest chairs I could find. I then didn't touch this space since. It just got cluttered and truly a mess. It was quite embarrassing, since it's like a glimpse into your house. I like to think my house usually looks better than this, so I knew it was nigh time to give it a makeover.
DIY outdoor porch or patio furniture. Learn how to make these chairs for about $20 each!  Porch and patio decor and decorating ideas
 And after:
DIY outdoor porch or patio furniture. Learn how to make these chairs for about $20 each!  Porch and patio decor and decorating ideas
 I'm still not sure I'm going to keep that lantern there. I actually took all the photos with it there, then moved it and loved it. Then I asked my husband what looks better and he said with the lantern :) So, there you go. I'm not sure I was wise in trusting his opinion, but I did :) haha

DIY outdoor porch or patio furniture. Learn how to make these chairs for about $20 each!  Porch and patio decor and decorating ideas
 For the table in between the chairs, I used one of my old painted tree stumps that I used to have in our living room as a coffee table.  
DIY outdoor porch or patio furniture. Learn how to make these chairs for about $20 each!  Porch and patio decor and decorating ideas
 This "onion" as my husband called it, was a Home Goods find for $22! It matched this area perfectly. And the lantern is from Hobby Lobby. It was actually a really dark green, but being out in the sun for years changed it. I was actually going to spray paint it a few weeks ago, but got lazy and didn't. I'm glad I didn't. This sun washed color is beautiful with the space (minus the bottom wax drenched part :) )
DIY outdoor porch or patio furniture. Learn how to make these chairs for about $20 each!  Porch and patio decor and decorating ideas

 To add more color, which is rare, I got these beautiful purple flowers to go on the tree stump.
DIY outdoor porch or patio furniture. Learn how to make these chairs for about $20 each!  Porch and patio decor and decorating ideas
 This side of my porch also got a little refresh. The rug that's below the chairs used to be under that bench in front of the door. I got so sick of the wind blowing it and wrinkling it, so I moved it. I also added my Fresh Cut Flowers sign. My husband joked that someone is going to come back expecting to buy flowers, and then my neighbor said the same thing. So, at this point, I'm just waiting for someone to come a knockin' :)
DIY outdoor porch or patio furniture. Learn how to make these chairs for about $20 each!  Porch and patio decor and decorating ideas
 I did add a lot more flowers to the porch, so I will have enough to 'fresh cut' if need be :)
DIY outdoor porch or patio furniture. Learn how to make these chairs for about $20 each!  Porch and patio decor and decorating ideas
 I just love the look of this now, especially compared to how it did look. It's much more inviting!
DIY outdoor porch or patio furniture. Learn how to make these chairs for about $20 each!  Porch and patio decor and decorating ideas

DIY outdoor porch or patio furniture. Learn how to make these chairs for about $20 each!  Porch and patio decor and decorating ideas
 As for all the wreaths, those were all from Hobby Lobby, and the rug, pillows, cushions and striped throw is from Target.

DIY outdoor porch or patio furniture. Learn how to make these chairs for about $20 each!  Porch and patio decor and decorating ideas
 I was tempted to stain these chairs since it's so much easier than painting. I really went back and forth a lot. I'm so glad I painted them white, they brightened this space so much! I think if they were stained brown, they would get lost in the color of my house.
DIY outdoor porch or patio furniture. Learn how to make these chairs for about $20 each!  Porch and patio decor and decorating ideas
And just an FYI, these suckers are heavy and sturdy! They are great for places that have high wind :) ...like my porch!

These cost around $50 to do, really around $20 each. But that doesn't include everything I had on hand. It just includes the lumber cost. Paint, screws, wood glue, filler, etc will of course cost you more if you don't already have any like I did.


Disclosure of Material Connection: Some of the links in the post above are “affiliate links.” This means if you click on the link and purchase the item, I will receive an affiliate commission. Regardless, I only recommend products or services I use personally and believe will add value to my readers. I am disclosing this in accordance with the Federal Trade Commission’s 16 CFR, Part 255: “Guides Concerning the Use of Endorsements and Testimonials in Advertising.”