kids space etiketine sahip kayıtlar gösteriliyor. Tüm kayıtları göster
This post contains affiliate links

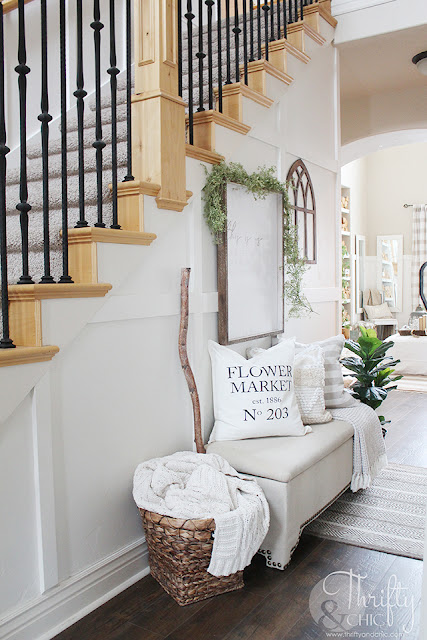
We have lived in our house for almost 11 years now, and have literally had a bench in our entryway since we moved in. At first, I just placed one there because the long hallway looked so empty, and I wanted it to be a place for people to take on and off their shoes. Yes, I'm one of those people who get the heebie-jeebies when you walk into my home with shoes on. Then we started to have kids, I realized a need for shoe storage. I upgraded our little bench to a storage bench. This thing has worked amazing for the past few years. After 11 years of having a bench here, I bet this bench was used to sit on maybe a handful of times. Maybe. It did function well for shoe storage, but that was it.
http://www.thriftyandchic.com/2019/04/diy-rustic-x-console-table.html

Over the past few months, I realized I wanted a table in here instead. My kids throwing pillows off the bench every.single.time. to grab shoes was getting frustrating. I know...my own fault. I dealt with it. To ease my anxiety, I started brainstorming ideas for tables and shoe storage. I thought of a lot of ideas. I'll share them just to give you guys ideas on what you can do also :)

My first idea was building another table just like this one I did for my mom. I loved the size and the storage possibilities. But, I really wanted to use some old wood from my outdoor table. In order to do that, I would have to wait until warmer weather since it is currently soaked under a foot of snow. I wanted something now :)
http://www.thriftyandchic.com/2019/04/diy-rustic-x-console-table.html

Thinking about the storage idea, I was gravitating towards the idea of using cube storage from Ikea. I'm not a fan of the cube look, so I was going to add some legs to it and then make doors. Each kid would have 4 cubes, which would be so perfect! Great for backpacks, mittens and scarves, plus all of their shoes. It be something similar to this one I made for my kitchen but with the 8 cubes:
http://www.thriftyandchic.com/2019/04/diy-rustic-x-console-table.html

I played around with the idea of using a simple sofa table, and putting large baskets underneath for the shoes. I would top these off with blankets to make it look prettier. This would have been my cheapest option since I already had a table in storage. On that note, this was not that table or else I would have kept it :) I pulled this table from behind my sofa where I want it to stay.
http://www.thriftyandchic.com/2019/04/diy-rustic-x-console-table.html

So, I was on the way to Home Goods to get some large baskets. You know, totally going with the cheapest option. I then found this beauty. It was narrow, and had two shelves with a partition in the middle. I tried all I could to think why I shouldn't buy it, but then someone else was looking at it. And you know how that goes, my competitive spirit kicked in. ha! So, I snagged it. Totally planning on just bringing it home and hating it, then returning it. But, alas, I loved it and it works oh so well!
http://www.thriftyandchic.com/2019/04/diy-rustic-x-console-table.html

For the shoes, I have the baskets divided. Each side is for one child. The top baskets are for boots, the bottom for smaller shoes. I've had this for about 2 weeks, and seriously have no complaints. Getting the shoes is so much easier with them divided like this.
http://www.thriftyandchic.com/2019/04/diy-rustic-x-console-table.html

Plus! ...and of course most importantly. I have a new space to decorate! I've never really had an entryway table to decorate. I have the small one in my front living room, but that stay's the same for the most part and really acts more like a side table. So, this is new territory for me.
http://www.thriftyandchic.com/2019/04/diy-rustic-x-console-table.html

I put these arches up around Christmas, and am still not sick of them. I like the space they take up on this big wall.
http://www.thriftyandchic.com/2019/04/diy-rustic-x-console-table.html

As for the tabletop, I went with my staples. Books, candlesticks, beaded garland and a clock.
http://www.thriftyandchic.com/2019/04/diy-rustic-x-console-table.html


http://www.thriftyandchic.com/2019/04/diy-rustic-x-console-table.html

This table isn't as wide as I would have liked for the space, so I flanked it with this pretty little faux fiddle leaf fig.
http://www.thriftyandchic.com/2019/04/diy-rustic-x-console-table.html


And then kept my blanket ladder on the left side. Swagged it with some beaded garland and a wreath.
http://www.thriftyandchic.com/2019/04/diy-rustic-x-console-table.html
I love this view looking into my living room!
http://www.thriftyandchic.com/2019/04/diy-rustic-x-console-table.html
And here's the view of my whole staircase. I like how the arches kind of mirror the mirrors above with color. It ties the two areas
http://www.thriftyandchic.com/2019/04/diy-rustic-x-console-table.html
Here's a closer look at the side of the table. I love this detail and the color.
Entryway decor and decorating ideas. Entryway table decor. Entryway storage ideas. How to decorate your entry way. Two story entryway ideas. Board and batten entryway.
Sources for everything: 
Home Goods: Entryway table, top baskets
Hobby Lobby: Bottom baskets, candlesticks, clock, lamp, tray, wreath
Michaels: Aged terracotta pots
Ikea: Faux greenery
DecorSteals: Ladder, fiddle leaf fig
Beaded garland: Handmade or similar (link)
Jute Rug: Amazon (link)

I did a lot of searching for a cute entryway table before I found this one, here are a few of my faves! (click on the picture for the link)


Follow me on my social for sneak peaks, live videos, and fun new things that are going on!
  
Pin for later:
Entryway decor and decorating ideas. Entryway table decor. Entryway storage ideas. How to decorate your entry way. Two story entryway ideas. Board and batten entryway.

Entryway decor and decorating ideas. Entryway table decor. Entryway storage ideas. How to decorate your entry way. Two story entryway ideas. Board and batten entryway.

Entryway decor and decorating ideas. Entryway table decor. Entryway storage ideas. How to decorate your entry way. Two story entryway ideas. Board and batten entryway.

Disclosure of Material Connection: Some of the links in the post above are “affiliate links.” This means if you click on the link and purchase the item, I will receive an affiliate commission. Regardless, I only recommend products or services I use personally and believe will add value to my readers. I am disclosing this in accordance with the Federal Trade Commission’s 16 CFR, Part 255: “Guides Concerning the Use of Endorsements and Testimonials in Advertising.” 

I was provided product by DecoArt and compensated to write about this project, but all thoughts, opinions, and ideas are my own :)

As I am writing this, it is so weird to think that summer break is just in a few more weeks! Seriously though, it's snowing outside my window right now. So, yeah. Who would guess warm temps are *hopefully* just a few weeks away? I'm being super hopeful they are :) 

As my kids are getting older, boredom is sitting in quicker than ever. I'm not one that allows for much screen time, so it's great having a few ideas in my back pocket when true boredom hits. I know that when school is out and the reality of the long hot days are here, it's a good thing to have lots of ideas to keep them busy! Today, I'm sharing with you my go to way to bust the boredom this summer in what more than a "Summer Boredom Buster" jar! 
When boredom strikes one of your kids, they simply pick an activity out of the jar. So, what do you need to create one yourself? Just a jar, some blocks, discs, or popsicle sticks, some paint, and lots of ideas! Don't worry on the ideas part, I got you covered at the bottom of the post :) I found this jar at a local craft store along with these 1" wood blocks.

 I then used DecoArt's Galaxy Glitter and Americana Acrylic Paint to bring life to the blocks. The colors I used :
Galaxy Glitter Aqua Meteor with a Americana Acrylic Paint base of Peacock Teal
Galaxy Glitter Ultraviolet with a base of Purple Pizzazz
Galaxy Glitter Pink Cosmos with a base of Bubblegum Pink
Galaxy Glitter Aurora Borealis Green with a base of Kelly Green
Galaxy Glitter Supernova Berry with a base of Magenta

 I painted one coat of acrylic paint on each block's connecting 4 sides, leaving a top and bottom bare. 

 Next, after the acrylic paint was dried, each block received two coats of the paired Galaxy Glitter. The Galaxy Glitter does take some time to dry, especially with thick coats. I found that two medium thick coats created enough glitter to do the trick! So, put on one coat. Let it harden. Then put on the next!

I let these all dry overnight to harden. 

I then wrote something fun to do on each one. On the opposite side of some I wrote a chore, or another fun item. I figured when they pick one out of the jar, they can then "roll the dice" kind of thing. Or, they need to do the chore before they do the fun thing! If they get a block with two fun things, then yay for them! :) 
 I then placed these all in the jar ready for some summer fun! 
My kids are already wanting to play with the blocks, just by themselves :) They can't wait to build something with them...which can totally be an idea for the jar! 

Since I'm a stay at home full time working mom, most of these ideas are things that the kids can do at home and free! I figure every once in awhile it wouldn't hurt to throw in some fun things like going out of ice cream or lunch. Of course, these are just ideas that I used for my kids, if yours are older, think of some age appropriate things for them to do too! 

In need of some ideas for your Summer Boredom Buster jar? Here are a few!
Make a craft
Play in the water (pool, sprinklers, etc)
Plant some flowers
Watch a movie
Make popsicles
Go for a walk
Paint your nails
Ride bikes
Have ice cream
Go to the splash pad
Have a dance party
Chalk Art
Go to the ice cream parlor
Go to the park
Bake
Go to lunch
Play dress up
Color
Read a book
Do a puzzle
Cloud watch
Have a picnic
Walk the dog
Do a craft
Make jewelry
Write a story
Make lemonade 
Make a fort
Play tag
Blow bubbles
Paint rocks
Play with play-doh
Go to the farm
Have a lemonade stand
Have a water fight
Go for a nature walk
Play cards 
Play I-spy
Catch bugs
Chase butterflies
Do a science experiment
Make puppets (out of socks or paper bags)
Draw a story
Make goodies to take to neighbors
Paint
Build a sand castle
Play outdoor games
Go to the library
Play a game
Build blocks (with the blocks in the jar!)
Have a play date

CHORE:
Clean stuff out of car
Help with dishes
Clean your room
Vacuum
Help with laundry
Make your bed
Dust
Help pull weeds
Pick up toys
Sweep
Pick up 5 things
Pick up 10 things
Brush the dog


To find more glittery ideas, be sure to check out DecoArt and their social media for more inspiration!
www.decoart.com
Facebook
Instagram
Pinterest


Pin for later:


Disclosure of Material Connection: This is a “sponsored post.” The company who sponsored it compensated me via a cash payment, gift, or something else of value to write it. Regardless, I only recommend products or services I use personally and believe will be good for my readers. I am disclosing this in accordance with the Federal Trade Commission’s 16 CFR, Part 255: “Guides Concerning the Use of Endorsements and Testimonials in Advertising.”

When you have a playhouse and your promise your kids that you will decorate it, you do it....even if it's snowy and gloomy :) I had plans to decorate this for Christmas since I built it, but the pink on it total threw me off. As you know, I'm not one for much color. It took all it had in me to not paint the pink black. But, this wasn't for me :) So, I embraced the pink and decided to make a wintery candy land! 

Candy Land Christmas Decor and decorating ideas. Playhouse Christmas decor. How to decorate a kids space for Christmas.
 As you can tell by the pictures, it's been pretty gloomy outside. :) 

I never knew in my wildest dreams I would ever buy a white tree. I know, I know. I love white and decorate with nothing else...but, a white tree was a little faux pas for me. I went a search for a pink tree but couldn't find one, so I decided to embrace the white. 

I brought in the pink from the door into the decorations with this Merry and Bright sign along with some tassels hanging on the lantern. 
Candy Land Christmas Decor and decorating ideas. Playhouse Christmas decor. How to decorate a kids space for Christmas.

Since I had a white tree, I wanted to bring in some pinks and inevitably large lollipops were added...because why not? :)
Candy Land Christmas Decor and decorating ideas. Playhouse Christmas decor. How to decorate a kids space for Christmas.
 I hung some pompom garland along the roof to add a little more whimsy. 
Candy Land Christmas Decor and decorating ideas. Playhouse Christmas decor. How to decorate a kids space for Christmas.
 Most of these decorations are from Hobby Lobby. The tree was from Walmart. The green garland from Michaels. 
Candy Land Christmas Decor and decorating ideas. Playhouse Christmas decor. How to decorate a kids space for Christmas.

Now I can't wait for it to snow and see how this all looks! Hope you all have a Merry Christmas!

This post contains affiliate links.

I shared the outside of the playhouse with you last week, and as promised, today I'll be sharing with you the inside! It took awhile for me to figure out what I wanted to do with the inside. What kind of stuff to put in there and what not. I knew this was going to be open to the elements the majority of the year, so I had to make sure everything could be washed or sprayed down easily. And I had to make sure not to spend too much money on it just in case it got ruined quickly.

The first big part was painting everything. I used Behr's exterior paint in semi-gloss in the color Swiss Coffee for the entire inside. Once everything was painted, I then added a stencil to the floor.  This stencil is from DecoArt and the paint is a dark grey that I mixed up, also in an exterior paint. I then finished it with a couple coats of polyurethane.


DIY playhouse interior decor and decorating ideas. Inside of playhouse decor. How to decorate the inside of a playhouse. DIY playhouse decor and ideas.
 I knew I wanted to add my kids "signatures" to the playhouse somewhere. I decided to incorporate them into the stencil itself. I have a hand print in each corner and they signed their names next to them.
DIY playhouse interior decor and decorating ideas. Inside of playhouse decor. How to decorate the inside of a playhouse. DIY playhouse decor and ideas.
 The ceiling ended up turning out better than I had planned. The staples we had used to put on the roof  were too long and went right through the plywood. It was a complete hot mess on the inside. To remedy this, I cut cedar planks (some of them parts of an old fence, some of them new) to fit in between the trusses. I then whitewashed them. I didn't want them all white, but wanted some of the wood character to come through.
DIY playhouse interior decor and decorating ideas. Inside of playhouse decor. How to decorate the inside of a playhouse. DIY playhouse decor and ideas.
 I hung a chandelier I found off the Facebook marketplace right in the middle. It doesn't offer any light or anything, but it does add a little bit of  glamour :)
DIY playhouse interior decor and decorating ideas. Inside of playhouse decor. How to decorate the inside of a playhouse. DIY playhouse decor and ideas.
 In one of the eves, I hung a faux clock that I made.
DIY playhouse interior decor and decorating ideas. Inside of playhouse decor. How to decorate the inside of a playhouse. DIY playhouse decor and ideas.
 I also added these wood corbels in the corners just to add a little more character. The curtains are grey ticking fabric from Hobby Lobby. I just hemmed all the edges then stapled them to the wood to hang.
DIY playhouse interior decor and decorating ideas. Inside of playhouse decor. How to decorate the inside of a playhouse. DIY playhouse decor and ideas.
 I made some bookshelves to hold books. Obviously, their books will look a little different than this :) That hanging plant can also be swapped out for some crayons. I totally had the intention of keeping them in there, but then I realized how tempting crayons are for kids in a huge blank space. We already had some problems with a pen finding it's way in there :)
DIY playhouse interior decor and decorating ideas. Inside of playhouse decor. How to decorate the inside of a playhouse. DIY playhouse decor and ideas.


DIY playhouse interior decor and decorating ideas. Inside of playhouse decor. How to decorate the inside of a playhouse. DIY playhouse decor and ideas.
 The other side is where the kitchen set is, so for the eves I hung a Fresh Baked Pies sign I got from the Target Dollar Spot last year. I added a little 'artwork' in the form of contact paper I found at my grocery story. For reals. I searched high and low on the internet for a kind I liked, and totally figures I would find one I loved while I was grabbing toilet paper. :) I placed the contact paper in painted frames.
DIY playhouse interior decor and decorating ideas. Inside of playhouse decor. How to decorate the inside of a playhouse. DIY playhouse decor and ideas.
 The "Home Sweet Home" metal sign was a clearance find from Michaels.
DIY playhouse interior decor and decorating ideas. Inside of playhouse decor. How to decorate the inside of a playhouse. DIY playhouse decor and ideas.
 This kitchen set was a Christmas present to my kids a couple of years ago. It got used, then forgotten, then used. And truthfully, it was just taking up a lot of space in my front room :) Plus, we had a dog kennel in front of it for awhile so I wanted to move it in here so it would get more time in the spot light. Seriously though, it will probably be kept more clean in here than inside our house. The pup slings slobber everywhere when he's in his kennel. I had to clean this thing weekly. Not going to miss that!
DIY playhouse interior decor and decorating ideas. Inside of playhouse decor. How to decorate the inside of a playhouse. DIY playhouse decor and ideas.
 This is from KidKraft. (link here). It's their vintage kitchen in white. I have also seen one in pink. You would be amazed at how much stuff fits in all these cabinets!
DIY playhouse interior decor and decorating ideas. Inside of playhouse decor. How to decorate the inside of a playhouse. DIY playhouse decor and ideas.

As for the "sitting area". These table and chairs are from Ikea. I painted them and added contact paper to the tops. I decided I liked the buffalo check fabric better and kept it on there as a type of table clothe.

DIY playhouse interior decor and decorating ideas. Inside of playhouse decor. How to decorate the inside of a playhouse. DIY playhouse decor and ideas.
 The artwork is from Hobby Lobby. I needed to find something thin enough to fit in between the studs, which was actually harder than you would think. So, I fell in love with these when I saw them, they were the perfect size.
DIY playhouse interior decor and decorating ideas. Inside of playhouse decor. How to decorate the inside of a playhouse. DIY playhouse decor and ideas.


DIY playhouse interior decor and decorating ideas. Inside of playhouse decor. How to decorate the inside of a playhouse. DIY playhouse decor and ideas.
 I've seen about 5 kids in here at once and there was plenty of room! I kept the space on all the other corners pretty empty so it wouldn't be too cramped. We have lots of neighborhood kids and I knew they would all be coming over to play.
DIY playhouse interior decor and decorating ideas. Inside of playhouse decor. How to decorate the inside of a playhouse. DIY playhouse decor and ideas.


DIY playhouse interior decor and decorating ideas. Inside of playhouse decor. How to decorate the inside of a playhouse. DIY playhouse decor and ideas.


DIY playhouse interior decor and decorating ideas. Inside of playhouse decor. How to decorate the inside of a playhouse. DIY playhouse decor and ideas.
 I did decide to add some solar string lights in here for some light. I just fed the line through one of the windows and have the panel outside on the side. These lights aren't very bright, but will give off plenty of light when I put up on the plywood on the windows during the winter.
DIY playhouse interior decor and decorating ideas. Inside of playhouse decor. How to decorate the inside of a playhouse. DIY playhouse decor and ideas.
 Now, of course, I would love for everything to be kept so nice and pretty with no color. Just white, black and grey. But, you know that doesn't happen with kids :) So, here's a few things that they play with in the playhouse.

First up, their dishes. These dishes are from Green Toys. They are actually food safe and can go in the dishwasher! They come with 4 of each of the cups, bowls, plates, and even knives, spoons, and forks. (click here for link)
DIY playhouse interior decor and decorating ideas. Inside of playhouse decor. How to decorate the inside of a playhouse. DIY playhouse decor and ideas.
 As for the food, I actually have a lot inside, but wanted a complete set outside. And ones that would wear well. This set is from Melissa and Doug. (link here) It's made of wood, so I'm hoping it will last awhile!
DIY playhouse interior decor and decorating ideas. Inside of playhouse decor. How to decorate the inside of a playhouse. DIY playhouse decor and ideas.


DIY playhouse interior decor and decorating ideas. Inside of playhouse decor. How to decorate the inside of a playhouse. DIY playhouse decor and ideas.
 And since this is their 'house'. Why not spark more imaginative play, right? This is another Melissa and Doug item (link here) that was given to them last year for Christmas. It was used, kind of. But, it has already seen so much more use since being placed in here. It's actually missing a duster, which I have no clue where that ran off to.
DIY playhouse interior decor and decorating ideas. Inside of playhouse decor. How to decorate the inside of a playhouse. DIY playhouse decor and ideas.

And that's it.....for now :) I think I might add something to one of the corners, like a reading nook or something. Still haven't figured that out.

You can find the outside tour and design here:


Links for things mentioned above (click on picture)

Melissa and Doug Cleaning Set


Melissa and Doug Wood Food Set


Green Toys Dish Set
Solar String Lights


Disclosure of Material Connection: Some of the links in the post above are “affiliate links.” This means if you click on the link and purchase the item, I will receive an affiliate commission. Regardless, I only recommend products or services I use personally and believe will add value to my readers. I am disclosing this in accordance with the Federal Trade Commission’s 16 CFR, Part 255: “Guides Concerning the Use of Endorsements and Testimonials in Advertising.”