wreaths etiketine sahip kayıtlar gösteriliyor. Tüm kayıtları göster

I was provided product by DecoArt and compensated to write about this project, but all thoughts, opinions, and ideas are my own :)

When you do as many DIY projects as me, you get a lot of scrap wood pieces. And if you are also like me, you can't ever seem to throw those pieces away. You never know when that 5 inch piece of molding or wood is going to come to good use, right? Ha! Serious though, my scrap pile is so big it's a little ridiculous. Every once in awhile I try to go through it and use it up, and I actually do pull pieces from it often to use on other projects. Today, I'm going to share with you a cute little spring wreath using nothing but scrap would pieces from my pile. 
DIY scrap wood wreath. DIY spring wreath. Reclaimed wood wreath. DIY spring decor and decorating ideas.
 I love how this turned out so much that I'll probably be doing another one which I'll update this post with to give you all more ideas. 

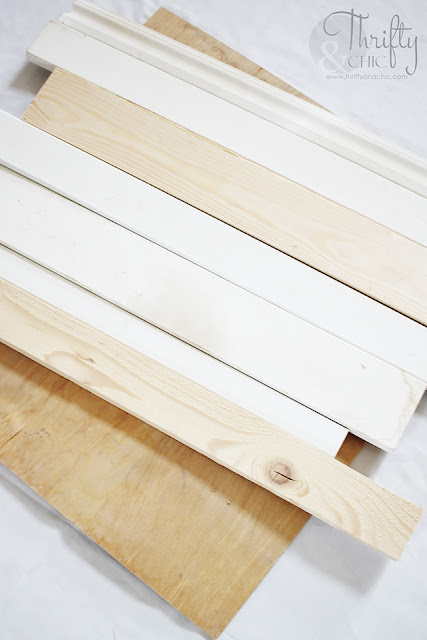
So, here are my scrap would pieces. I used quite a mixture or wood or mdf in all different sizes. The backing that I used was also a scrap piece from one of my furniture builds, it's 1/16" piece of plywood. If you don't have this available, you can buy it at a building supply store for about $5 for a 4'x4' piece.
DIY scrap wood wreath. DIY spring wreath. Reclaimed wood wreath. DIY spring decor and decorating ideas.
 The width of all the wood pieces together was about 19". That was around the size I wanted for my wreath, so I made sure that all the pieces were at least that length also. 

I painted the wood and mdf using DecoArt's Americana Acrylic Paint in Royal Navy, Berry Cobble, and Vintage Pink. I originally had left the middle mdf piece white, but then decided to use Snow White in the acrylic paint on it also. This took about two coats for full coverage.
DIY scrap wood wreath. DIY spring wreath. Reclaimed wood wreath. DIY spring decor and decorating ideas.

DIY scrap wood wreath. DIY spring wreath. Reclaimed wood wreath. DIY spring decor and decorating ideas.
 Next, I used the wood glue and squirted it all over the plywood. 
DIY scrap wood wreath. DIY spring wreath. Reclaimed wood wreath. DIY spring decor and decorating ideas.
 I then added the wood and mdf on top of the plywood, securing them down with weights. I kept these like this for a couple of hours to make sure the wood glue adhered properly. 
DIY scrap wood wreath. DIY spring wreath. Reclaimed wood wreath. DIY spring decor and decorating ideas.
 Next, I used a piece of string and a pen to outline the outer circle. I did this by tying a knot in the middle of the string and securing it in the very center of the pieces with a thumbtack. I then stood the pen up and stretched the string out as far as it could go, and made a circle. To get the length of the string initially, I just pulled it out to the shortest edge. It ended up being about 9".
DIY scrap wood wreath. DIY spring wreath. Reclaimed wood wreath. DIY spring decor and decorating ideas.
 I then took a bowl (an easier method) to trace the inner circle. Since I wanted to make this circle off centered, I just eyed where I wanted it. If you want it centered, you would want to measure to make sure it was equidistant from all edges of the previous circle.
DIY scrap wood wreath. DIY spring wreath. Reclaimed wood wreath. DIY spring decor and decorating ideas.

DIY scrap wood wreath. DIY spring wreath. Reclaimed wood wreath. DIY spring decor and decorating ideas.
 To make the jigsawing process easier, I drilled a hole into the middle circle that's big enough to fit the jigsaw blade.
DIY scrap wood wreath. DIY spring wreath. Reclaimed wood wreath. DIY spring decor and decorating ideas.
 Now the fun part :) I put on my protective gear, and use the jigsaw to cut out the outer circle.
DIY scrap wood wreath. DIY spring wreath. Reclaimed wood wreath. DIY spring decor and decorating ideas.
 Next, I cut out the center circle starting in the hole that was drilled earlier. 
DIY scrap wood wreath. DIY spring wreath. Reclaimed wood wreath. DIY spring decor and decorating ideas.
 I sanded all the edges.
DIY scrap wood wreath. DIY spring wreath. Reclaimed wood wreath. DIY spring decor and decorating ideas.
 Then painted the edges using the Snow White.
DIY scrap wood wreath. DIY spring wreath. Reclaimed wood wreath. DIY spring decor and decorating ideas.
 I added tied jute onto the back for it to hang. I secured the knots with a staple gun.
DIY scrap wood wreath. DIY spring wreath. Reclaimed wood wreath. DIY spring decor and decorating ideas.
 To finish it off, I hot glued flowers onto the bottom left along with a "hello" chipboard sign onto the top right that I had used last spring on a different wreath.
DIY scrap wood wreath. DIY spring wreath. Reclaimed wood wreath. DIY spring decor and decorating ideas.
 The "hello" was painted using DecoArt Americana Decor Matte Metallics in Aged Bronze.
DIY scrap wood wreath. DIY spring wreath. Reclaimed wood wreath. DIY spring decor and decorating ideas.
 And there's the finished piece!
DIY scrap wood wreath. DIY spring wreath. Reclaimed wood wreath. DIY spring decor and decorating ideas.

DIY scrap wood wreath. DIY spring wreath. Reclaimed wood wreath. DIY spring decor and decorating ideas.
It has found it's place on my mantel for now, but it will be heading to my door when the weather gets a little bit better.
DIY scrap wood wreath. DIY spring wreath. Reclaimed wood wreath. DIY spring decor and decorating ideas.
I just love being able to make things like this at little to no cost; it's the best!

To find more spring decor ideas, be sure to check out DecoArt and their social media for more inspiration!
www.decoart.com
Facebook
Instagram
Pinterest


Pin for later:
DIY scrap wood wreath. DIY spring wreath. Reclaimed wood wreath. DIY spring decor and decorating ideas.

Disclosure of Material Connection: This is a “sponsored post.” The company who sponsored it compensated me via a cash payment, gift, or something else of value to write it. Regardless, I only recommend products or services I use personally and believe will be good for my readers. I am disclosing this in accordance with the Federal Trade Commission’s 16 CFR, Part 255: “Guides Concerning the Use of Endorsements and Testimonials in Advertising.”
This post contains affiliate links.

Christmas season is in full swing around here. I have a list of projects a mile long. I'm sure I'll get to some, but some just don't matter :) It's like one of those things, you get your list so long and feel like you can't do it and stress over all of it. Well, I'm just letting go this Christmas and keeping things pretty simple. This wood slice wreath is one of those crafts that I knew I wanted to do and wouldn't take a long time doing it. I'm excited to share this tutorial with the Christmas I DIYed That blog hop hosted by Jen from Noting Grace. These ladies are sharing some wonderful Christmas inspiration. Be sure to check them all out (links below). 
DIY 5 minute wood slice wreath tutorial. How to make a wood disc wreath. DIY easy Christmas crafts. DIY Christmas ideas. Farmhouse Christmas decor. Woodland Christmas wreath.


This wreath serious took about 5 minutes to make. You just need a few things to make it:
Wood discs (about 3-4" in diameter. I bought my here)
Large bowl or plate
Hot glue
Ribbon or bow
Jute
Pine cones.

I used 13 pieces as the bottom layer and 13 for the top.
DIY 5 minute wood slice wreath tutorial. How to make a wood disc wreath. DIY easy Christmas crafts. DIY Christmas ideas. Farmhouse Christmas decor. Woodland Christmas wreath.
My bowl is about 10" in diameter. I picked the largest discs and placed them around the bowl.
DIY 5 minute wood slice wreath tutorial. How to make a wood disc wreath. DIY easy Christmas crafts. DIY Christmas ideas. Farmhouse Christmas decor. Woodland Christmas wreath.
Once I had them all in place and lined up how I wanted, I moved the bowl.
DIY 5 minute wood slice wreath tutorial. How to make a wood disc wreath. DIY easy Christmas crafts. DIY Christmas ideas. Farmhouse Christmas decor. Woodland Christmas wreath.
Then with each of the smaller discs, I placed some hot glue on the back and put it right on top of where two bottom discs touch. 
DIY 5 minute wood slice wreath tutorial. How to make a wood disc wreath. DIY easy Christmas crafts. DIY Christmas ideas. Farmhouse Christmas decor. Woodland Christmas wreath.
I did this same process around the whole wreath. 
DIY 5 minute wood slice wreath tutorial. How to make a wood disc wreath. DIY easy Christmas crafts. DIY Christmas ideas. Farmhouse Christmas decor. Woodland Christmas wreath.
Now that the wreath is made, it's time to add the accessories. First up is the bow. I decided to make my own bow out of ribbon I found at Hobby Lobby. I cut a 14" piece, then looped it, securing the ends with hot glue.
DIY 5 minute wood slice wreath tutorial. How to make a wood disc wreath. DIY easy Christmas crafts. DIY Christmas ideas. Farmhouse Christmas decor. Woodland Christmas wreath.
Next I cut another 14" piece, placed the middle on the back of the looped piece. I then cut about a 4" piece, folded it in half, and looped it around both those pieces securing it in place on both ends with hot glue.
DIY 5 minute wood slice wreath tutorial. How to make a wood disc wreath. DIY easy Christmas crafts. DIY Christmas ideas. Farmhouse Christmas decor. Woodland Christmas wreath.
I fluffed it out, and hot glued it onto one of the discs.
DIY 5 minute wood slice wreath tutorial. How to make a wood disc wreath. DIY easy Christmas crafts. DIY Christmas ideas. Farmhouse Christmas decor. Woodland Christmas wreath.
Next, I cut 3 pieces of jute at varying lengths.I glued the ends of each one onto the top of a pine cone. I tied the ends of the jute all together.
DIY 5 minute wood slice wreath tutorial. How to make a wood disc wreath. DIY easy Christmas crafts. DIY Christmas ideas. Farmhouse Christmas decor. Woodland Christmas wreath.
I glued the knot of the jute onto the disc behind the bow. I also did a lazy man's route of creating a thing to hang the wreath by hot gluing a two inch piece of jute on both ends to the discs. I can't guarantee this will hold it :)
DIY 5 minute wood slice wreath tutorial. How to make a wood disc wreath. DIY easy Christmas crafts. DIY Christmas ideas. Farmhouse Christmas decor. Woodland Christmas wreath.
I love how simple this wreath is, both in looks and how easy it is to make. Just lots of hot glue! 
DIY 5 minute wood slice wreath tutorial. How to make a wood disc wreath. DIY easy Christmas crafts. DIY Christmas ideas. Farmhouse Christmas decor. Woodland Christmas wreath.
It's been fun playing around with a home for this. I think I have settled on having it in my front room. What do you think? 
DIY 5 minute wood slice wreath tutorial. How to make a wood disc wreath. DIY easy Christmas crafts. DIY Christmas ideas. Farmhouse Christmas decor. Woodland Christmas wreath.
I think it goes with the theme in here pretty well. 
DIY 5 minute wood slice wreath tutorial. How to make a wood disc wreath. DIY easy Christmas crafts. DIY Christmas ideas. Farmhouse Christmas decor. Woodland Christmas wreath.

For lots more Christmas inspiration, check out all these talented ladies below! 

2018 Christmas I DIYed That Home Tour


Pin for later!
DIY 5 minute wood slice wreath tutorial. How to make a wood disc wreath. DIY easy Christmas crafts. DIY Christmas ideas. Farmhouse Christmas decor. Woodland Christmas wreath.


Disclosure of Material Connection: Some of the links in the post above are “affiliate links.” This means if you click on the link and purchase the item, I will receive an affiliate commission. Regardless, I only recommend products or services I use personally and believe will add value to my readers. I am disclosing this in accordance with the Federal Trade Commission’s 16 CFR, Part 255: “Guides Concerning the Use of Endorsements and Testimonials in Advertising.” 
I was provided product by DecoArt and compensated to write about this project, but all thoughts, opinions, and ideas are my own :)

In the past, I haven't really decorated for Christmas until after Thanksgiving. I still feel like it's supposed to be July around the time December comes so it's super hard to get into the holiday spirit. So, once Christmas comes and goes, I feel like I really missed the whole thing. I usually don't feel like it should be Christmas time until around February :) That being said, I'm doing things a little different this year. Christmas is going up...like now. Yep, Beginning of November. I figure that's a good way to get me into the spirit quicker. Will it work? I have no clue. But, it's worth the try! 

Now, I know that people will say, don't forget about Thanksgiving! I know, I know. I'm not trying to smother Thanksgiving with red bows, flocking and glitter. But, in my family, Thanksgiving is like the gateway to the holidays and is celebrated as so. We are still thankful, and will be just as thankful with a Christmas tree up instead of pumpkins and leaves on the table. 

Now that I justified myself for putting Christmas wreaths up the day after Halloween.... :) I'm going to share with you a practically free wreath made out of pine cones. Actually, not just one, but two wreaths! Made two separate ways to get two different looks. 
DIY Winter pine cone wreath. DIY pine cone crafts. DIY Christmas wreath tutorial. Christmas craft ideas. Easy Christmas crafts. DIY Christmas decor.

DIY Winter pine cone wreath. DIY pine cone crafts. DIY Christmas wreath tutorial. Christmas craft ideas. Easy Christmas crafts. DIY Christmas decor.
Supply list for both:
Pine cones (somewhat uniform in size)
DecoArt Dazzling Metallics in Festive Green and White Pearl. I also love the way Festive Red looks!
Floral wire and/or pony beads
Wire hanger
Hot glue
Bow

As I mentioned above, try to get pine cones in the same size to make your life easier.
DIY Winter pine cone wreath. DIY pine cone crafts. DIY Christmas wreath tutorial. Christmas craft ideas. Easy Christmas crafts. DIY Christmas decor.
 I love how these three colors pop off the pine cones. I will be using the Festive Red on another Christmas project coming up soon. The Pearl White is so pretty and sparkly that it looks like snow has fallen all over the pine cone.
DIY Winter pine cone wreath. DIY pine cone crafts. DIY Christmas wreath tutorial. Christmas craft ideas. Easy Christmas crafts. DIY Christmas decor.
 For the first, more simple wreath, you'll want to take your coat hanger:
DIY Winter pine cone wreath. DIY pine cone crafts. DIY Christmas wreath tutorial. Christmas craft ideas. Easy Christmas crafts. DIY Christmas decor.
 And unbend it and try to make as good of a circle as you can. You may need to use some pliers to get the ends to wrap around.
DIY Winter pine cone wreath. DIY pine cone crafts. DIY Christmas wreath tutorial. Christmas craft ideas. Easy Christmas crafts. DIY Christmas decor.
 Get the floral wire and cut them about 10" long. Wrap it around the pine cone in the middle and then around the wire hanger. Kind of bend the wire back into the pine cone so you can't see it from the front. I alternated the direction of each pine cone.
DIY Winter pine cone wreath. DIY pine cone crafts. DIY Christmas wreath tutorial. Christmas craft ideas. Easy Christmas crafts. DIY Christmas decor.
 Continue to do this all the way around the circle.
DIY Winter pine cone wreath. DIY pine cone crafts. DIY Christmas wreath tutorial. Christmas craft ideas. Easy Christmas crafts. DIY Christmas decor.
 Play around with the look of the pine cones, and when you got them just right, hot glue them to one another.
DIY Winter pine cone wreath. DIY pine cone crafts. DIY Christmas wreath tutorial. Christmas craft ideas. Easy Christmas crafts. DIY Christmas decor.
 Now take the Festive Green and brush it on all the edges of the pine cones.
DIY Winter pine cone wreath. DIY pine cone crafts. DIY Christmas wreath tutorial. Christmas craft ideas. Easy Christmas crafts. DIY Christmas decor.
 Finish it off by hot gluing a bow to the top!
DIY Winter pine cone wreath. DIY pine cone crafts. DIY Christmas wreath tutorial. Christmas craft ideas. Easy Christmas crafts. DIY Christmas decor.
 The Festive Green pops off the pine cones so beautifully.
DIY Winter pine cone wreath. DIY pine cone crafts. DIY Christmas wreath tutorial. Christmas craft ideas. Easy Christmas crafts. DIY Christmas decor.
 This is definitely a more simple look, if you want to fill it in more, you can easily just hot glue smaller pine cones on top. 
DIY Winter pine cone wreath. DIY pine cone crafts. DIY Christmas wreath tutorial. Christmas craft ideas. Easy Christmas crafts. DIY Christmas decor.
 Now for the second technique, the more fuller version. Take the Pearl White and squirt about a 3" line on some paper, or foil like I used. Then roll the pine cone in it. Make sure to cover tops and bottoms. This gives a really nice thick layer of paint on the pine cones that look just like snow fell on them.
DIY Winter pine cone wreath. DIY pine cone crafts. DIY Christmas wreath tutorial. Christmas craft ideas. Easy Christmas crafts. DIY Christmas decor.
 Do all of them at the same time and sit them out to dry. 
DIY Winter pine cone wreath. DIY pine cone crafts. DIY Christmas wreath tutorial. Christmas craft ideas. Easy Christmas crafts. DIY Christmas decor.
 Next, take your pony beads. I chose red just because that was the only available color the store had at the time. Talk about pony bead shortage :) I would do white or clear if they had it.
DIY Winter pine cone wreath. DIY pine cone crafts. DIY Christmas wreath tutorial. Christmas craft ideas. Easy Christmas crafts. DIY Christmas decor.
 Hot glue the pony bead onto the outside bottom of each pine cone. So, not in the middle, but as close to the bottom edge as you can.
DIY Winter pine cone wreath. DIY pine cone crafts. DIY Christmas wreath tutorial. Christmas craft ideas. Easy Christmas crafts. DIY Christmas decor.
 Take your hanger and keep it opened.
DIY Winter pine cone wreath. DIY pine cone crafts. DIY Christmas wreath tutorial. Christmas craft ideas. Easy Christmas crafts. DIY Christmas decor.
 Thread the pony beads onto the wire. I made sure that each time I put the pine cone on, the bead was on the left side.
DIY Winter pine cone wreath. DIY pine cone crafts. DIY Christmas wreath tutorial. Christmas craft ideas. Easy Christmas crafts. DIY Christmas decor.
 Add as many pine cones on as you can, leaving a little room to tie the wire together with some pliers. To finish the rest of the wire, use floral wire wrapped around the bottom section, and secured onto the wire (kind of like in the process of the first wreath above). When all the pine cones are on, start moving them around. I went in this order, one on the inside, one on the outside, one on top. I did this pattern around the entire thing trying to get them as close together as possible. Once they were how I wanted, I then add some hot glue where the touching points were.
DIY Winter pine cone wreath. DIY pine cone crafts. DIY Christmas wreath tutorial. Christmas craft ideas. Easy Christmas crafts. DIY Christmas decor.
 To finish it off, I placed a bow at the top.
DIY Winter pine cone wreath. DIY pine cone crafts. DIY Christmas wreath tutorial. Christmas craft ideas. Easy Christmas crafts. DIY Christmas decor.
 And there you have it! A beautiful, full wreath full of 'snow' touched pine cones.
DIY Winter pine cone wreath. DIY pine cone crafts. DIY Christmas wreath tutorial. Christmas craft ideas. Easy Christmas crafts. DIY Christmas decor.

DIY Winter pine cone wreath. DIY pine cone crafts. DIY Christmas wreath tutorial. Christmas craft ideas. Easy Christmas crafts. DIY Christmas decor.
 I love the texture that these wreaths bring! And if you don't have pine cones falling all over where you live, just go to the store and get those cinnamon ones in bags. Then you'd have a great smelling wreath too! 
DIY Winter pine cone wreath. DIY pine cone crafts. DIY Christmas wreath tutorial. Christmas craft ideas. Easy Christmas crafts. DIY Christmas decor.
Now, let me get back to decorating my heart out for Christmas before my husband comes home and stops me!

Be sure to check out DecoArt and their social media for more inspiration!
www.decoart.com
Facebook
Instagram
Pinterest


PIN FOR LATER:
DIY Winter pine cone wreath. DIY pine cone crafts. DIY Christmas wreath tutorial. Christmas craft ideas. Easy Christmas crafts. DIY Christmas decor.

DIY Winter pine cone wreath. DIY pine cone crafts. DIY Christmas wreath tutorial. Christmas craft ideas. Easy Christmas crafts. DIY Christmas decor.


 Disclosure of Material Connection: This is a “sponsored post.” The company who sponsored it compensated me via a cash payment, gift, or something else of value to write it. Regardless, I only recommend products or services I use personally and believe will be good for my readers. I am disclosing this in accordance with the Federal Trade Commission’s 16 CFR, Part 255: “Guides Concerning the Use of Endorsements and Testimonials in Advertising.”