Pin It
This post contains affiliate links. 

I've heard that January is the most depressing month. All the Christmas magic is long gone. The days are short. The weather is cold and dreary. We are months away from summer. Just sounds depressing, doesn't it? I remember last year around this time, we were getting temps in the negative teens. Today, as I am writing this, it's almost 60 degrees. I have no idea what is going on. I'm not hating it. Although my tulips are already coming up and that kind of freaks me out a little bit :) I know the weather is going to turn south any minute now and I'm going to be found cuddling up in my bed as long as I can.

7 ways to cozy up your bedroom. How to make your bedroom cozy. Bedroom decor and decorating ideas.
So, what are my secrets to getting a comfy cozy bed that I never want to leave? Here they are!

1. Flannel sheets. I love how soft and warm flannel sheets are. They are perfect to get into after a super long, cold day. I noticed I can get too hot sometimes using both the bottom and top sheet, so I often opt to sleep with no top sheet and use my duvet as one :)
7 ways to cozy up your bedroom. How to make your bedroom cozy. Bedroom decor and decorating ideas.

2. Layers and layers. I pile up all the layers on my bed. That means lots of super comfy down pillows, sweater pillow covers, my sheets, the duvet and down comforter, and extra throw blankets. I obviously don't sleep with all the pillows, but it sure does make my bed that much more inviting once night time comes along.

7 ways to cozy up your bedroom. How to make your bedroom cozy. Bedroom decor and decorating ideas.

3. Use an all-season down comforter. I just love how comfy, warm, and fluffy my down comforter is. With that baby, it makes getting out of bed seriously hard. It's also important to have a duvet that feels like butter on your skin. Serious. My duvet does that. It's from Crane and Canopy and is completely amazing.
7 ways to cozy up your bedroom. How to make your bedroom cozy. Bedroom decor and decorating ideas.
4. Add rugs! Or if you already have rugs, swap out your light summer rugs for some with more plush. Rugs will keep your footsies a lot warmer especially if you have hard floors.
7 ways to cozy up your bedroom. How to make your bedroom cozy. Bedroom decor and decorating ideas.

5. Layer your bedroom. Just don't layer your bed, add layers to the rest of your bedroom. Add curtains to your blinds, or even blinds and shades to your windows. Place throw pillows and blankets on chairs or benches. Add a nice soft rug under your bed.
7 ways to cozy up your bedroom. How to make your bedroom cozy. Bedroom decor and decorating ideas.
6. Bring in the light. I might be the only one that agrees with this, but it's super easy for me to stay in bed when the rest of the room is super bright during the morning. I love having the sunshine streaming in and hitting my white bedding. Makes me feel like I'm sleeping on a cloud. I can stay in bed all morning long when the blinds are open.
7 ways to cozy up your bedroom. How to make your bedroom cozy. Bedroom decor and decorating ideas.

7. Add texture. Adding texture adds to the overall space plus brings in a little bit more coziness too. You can do this with rugs, pillows, throws, and window treatments. Or even bring the outdoors in with this one. Throw some branches into a vase, or wood into the corner of your room.
7 ways to cozy up your bedroom. How to make your bedroom cozy. Bedroom decor and decorating ideas.

Bonus: This isn't decor related, but I have noticed that sleeping with socks on during the winter makes me sleep so much better and longer. Going to bed with cold feet is the pits. Your partner thinks so too :) lol. I always wear socks to get a better night's sleep. And yes, your partner will thank you for not using him/her as a foot warmer ;)

Want more style inspiration for your home? Check out Havenly. Havenly is a good option for designing your home! They work with any budget, big or small. You can start from scratch or work with a designer using your existing furniture pieces!

Pin for later:
7 ways to cozy up your bedroom. How to make your bedroom cozy. Bedroom decor and decorating ideas.


Disclosure of Material Connection: Some of the links in the post above are “affiliate links.” This means if you click on the link and purchase the item, I will receive an affiliate commission. Regardless, I only recommend products or services I use personally and believe will add value to my readers. I am disclosing this in accordance with the Federal Trade Commission’s 16 CFR, Part 255: “Guides Concerning the Use of Endorsements and Testimonials in Advertising.” 
Pin It
The below post contains affiliate links.

For most people, when January comes, that means they get their house back from Christmas :) Well, that used to be my case, but now we have a January packed full of birthdays, and I don't get my house back until February. We have had four birthday parties in our house in the past 15 days. Crazy! My house has been full of streamers, balloons, pink, purple, and mint for the past month. I love doing birthday's like this, but I also love getting my house back once all the madness settles down. 

Today I'm going to share with you one of the birthdays...as you may notice, it was unicorn themed. I was super excited when my little girl told me she wanted a unicorn birthday. 
DIY Unicorn party ideas. DIY Unicorn cake. DIY unicorn horn. Unicorn Birthday party ideas and unicorn party favor ideas
 Decorating for birthday's are always fun, but I love decorating the cakes the most. They are so stressful, but also the most rewarding.
DIY Unicorn party ideas. DIY Unicorn cake. DIY unicorn horn. Unicorn Birthday party ideas and unicorn party favor ideas
 To do this cake, I used Rosanna Pansion's version and changed it up a bit to make it my own.
DIY Unicorn party ideas. DIY Unicorn cake. DIY unicorn horn. Unicorn Birthday party ideas and unicorn party favor ideas
  First off, I did only two layers of cake (two full funfetti cake mixes, one mix for each layer). I then covered the entire thing in marshmallow fondant to give it a smooth look.
DIY Unicorn party ideas. DIY Unicorn cake. DIY unicorn horn. Unicorn Birthday party ideas and unicorn party favor ideas
 I used this buttercream recipe to make the rosettes. I doubled the recipe and used 4 different colors. You probably can't tell, but some pinks are lighter and some purples are a little bit more blue :) 
DIY Unicorn party ideas. DIY Unicorn cake. DIY unicorn horn. Unicorn Birthday party ideas and unicorn party favor ideas

DIY Unicorn party ideas. DIY Unicorn cake. DIY unicorn horn. Unicorn Birthday party ideas and unicorn party favor ideas
I went around about half the cake with the rosettes to give the unicorn a 'mane'.
DIY Unicorn party ideas. DIY Unicorn cake. DIY unicorn horn. Unicorn Birthday party ideas and unicorn party favor ideas

 I used a couple of different tips to create the flowers: Wilton 1M, 2A, 4B and 32.
DIY Unicorn party ideas. DIY Unicorn cake. DIY unicorn horn. Unicorn Birthday party ideas and unicorn party favor ideas
The unicorn horn was the best to make since it gave this whole piece life! I used luster dust from Hobby Lobby, they didn't have gold in stock, only bronze. I wanted gold but didn't have enough time to order it online. This is the luster dust I was going to use off of Amazon. And also, me being super prepared for this, didn't think to get a clean vanilla or almond extract. I had mint. I was seriously like seconds away from using the mint extract on this horn and ears until my neighbor said I could borrow some from her :) I can't lie, I love the smell of mint, but thought that would be a little odd on a funfetti cake. lol
DIY Unicorn party ideas. DIY Unicorn cake. DIY unicorn horn. Unicorn Birthday party ideas and unicorn party favor ideas
 So, I had this cake done like at 5 o'clock...that is, everything besides the eyes. I was terrified to ruin the cake and make the eyes a mess. It seriously sat there until 11...six hours...for me to get the nerve to do the eyes. I practiced a bazillion of times on scrap fondant plastered to round containers. I finally decided on an eye shape and figured the night wasn't getting any younger :) So, I took the plunge. If I had done this with buttercream frosting, it probably would have wiped off pretty easily if I made a mistake, but the only black I had laying around was gel. And that stuff just makes a mess. I am happy how they turned out...not quite symmetrical...but whose eyes are really symmetrical anyway, right? :)
DIY Unicorn party ideas. DIY Unicorn cake. DIY unicorn horn. Unicorn Birthday party ideas and unicorn party favor ideas

This was one of these cakes I wish I could make a week in advance just so I could enjoy the fruit of my labor longer. It took quite some time. I'm glad I didn't make this the day of the party. I would have cried seeing it cut into hours after making it.
DIY Unicorn party ideas. DIY Unicorn cake. DIY unicorn horn. Unicorn Birthday party ideas and unicorn party favor ideas


 Now back to the rest of the party decor. I went with a pink and purple theme.
DIY Unicorn party ideas. DIY Unicorn cake. DIY unicorn horn. Unicorn Birthday party ideas and unicorn party favor ideas
That sign in the background says "Be a unicorn in a field of horses."
DIY Unicorn party ideas. DIY Unicorn cake. DIY unicorn horn. Unicorn Birthday party ideas and unicorn party favor ideas
 I usually go all out with birthdays and create way too many little 'side dishes', sweets, or snacks. I went easy on myself this time around. I just made two extra things. This unicorn popcorn was a huge hit.
DIY Unicorn party ideas. DIY Unicorn cake. DIY unicorn horn. Unicorn Birthday party ideas and unicorn party favor ideas
 It's just buttered white popcorn with candy melts on it.
DIY Unicorn party ideas. DIY Unicorn cake. DIY unicorn horn. Unicorn Birthday party ideas and unicorn party favor ideas
 I then made unicorn 'poop' cookies...well, that flattened out. So they are more like stepped on unicorn poop. But, you get the idea :) I can do a tutorial on all of these if you want. Just let me know in the comments.
DIY Unicorn party ideas. DIY Unicorn cake. DIY unicorn horn. Unicorn Birthday party ideas and unicorn party favor ideas
 I found these cute unicorn horn party hats at Hobby Lobby for about $3. For the table cover, I used a white table clothe and some purple tulle. I then placed paper flowers all along it.
DIY Unicorn party ideas. DIY Unicorn cake. DIY unicorn horn. Unicorn Birthday party ideas and unicorn party favor ideas
 Here's the whole shebang. We did have some stuff in the kitchen, but didn't photograph that.
DIY Unicorn party ideas. DIY Unicorn cake. DIY unicorn horn. Unicorn Birthday party ideas and unicorn party favor ideas
I just love how this backdrop turned out. These balloons were actually left over from the other birthday party, but worked well with this one too. The streamers are the unicorn's mane. The flowers are foam flowers from Hobby Lobby. The eyes, ears, and horn were all cut on my Silhouette.
DIY Unicorn party ideas. DIY Unicorn cake. DIY unicorn horn. Unicorn Birthday party ideas and unicorn party favor ideas
 The back buffet was used for the party favor bags dressed up as unicorns.
DIY Unicorn party ideas. DIY Unicorn cake. DIY unicorn horn. Unicorn Birthday party ideas and unicorn party favor ideas
 The horns, ears and eyes were also cut on the Silhouette for these. The flowers are from Hobby Lobby as well and hot glued on.
DIY Unicorn party ideas. DIY Unicorn cake. DIY unicorn horn. Unicorn Birthday party ideas and unicorn party favor ideas
 And the favors inside? Why, unicorn poop of course! Classy...I know :) Unicorn poop in the form of multi-colored mini marshmallows.
DIY Unicorn party ideas. DIY Unicorn cake. DIY unicorn horn. Unicorn Birthday party ideas and unicorn party favor ideas
 I hope this gave you some ideas for your next unicorn party! This was a ton of fun. Also, the best place I found unicorn supplies (luckily they are almost everywhere now) is Zurchers, Target and Hobby Lobby. We got the plates, napkins, cups and large unicorn balloon at Zurchers (not pictured, sorry), and a few random unicorn stuff at the other stores :)

Oh, and need a good drink idea?
My go to, easy drink is two frozen lemonades mixed with 4 liters of Sprite or 7-Up. You can probably use some sparkling water for this too.


Disclosure of Material Connection: Some of the links in the post above are “affiliate links.” This means if you click on the link and purchase the item, I will receive an affiliate commission. Regardless, I only recommend products or services I use personally and believe will add value to my readers. I am disclosing this in accordance with the Federal Trade Commission’s 16 CFR, Part 255: “Guides Concerning the Use of Endorsements and Testimonials in Advertising.”
Pin It

I love all the natural wood in our house...that wasn't always the case. Years ago I wanted to paint it. But, my husband put a hard 'no' on that one. I'm glad he did. I have come to love the natural knotty alder in our home. I still hate our kitchen cabinets...but that's another post for itself. :) Our door and our banister posts are the knotty alder and have seen their fair share of dents, dings, and scratches throughout the years.
How to fix scratches in wood. The secret to removing scratches in wood. How to diminish the appearance of scratches in wood.
They weren't horrible; didn't even bother me. Well, enter in this cute pup:
How to fix scratches in wood. The secret to removing scratches in wood. How to diminish the appearance of scratches in wood.

The second we go out the door, even if it's just to get the mail. This dog is at the door scratching the good heck out of it. Ugh. I didn't notice he was doing this until too late and the damage was already done.  The damage was half way up the door and about 1/3 of the width.
How to fix scratches in wood. The secret to removing scratches in wood. How to diminish the appearance of scratches in wood.
I kind of freaked out. My husband oddly wasn't as mad as I thought he would be. Then I remembered a quick little trick to help hide those scratches. They will always be there until I can sand them down, or fill them, and restain or paint. But, this was a great bandaid, plus, I don't have do any staining or painting and can still keep my wood looking beautiful :)

The secret is walnuts.
How to fix scratches in wood. The secret to removing scratches in wood. How to diminish the appearance of scratches in wood.
Yep. Can you believe these can diminish the appearance of scratches on wood? They can!
Just get a chunk and start rubbing it into the scratches. These are my results.
Before (the top was actually already done, so this gives you a good before and after also):
How to fix scratches in wood. The secret to removing scratches in wood. How to diminish the appearance of scratches in wood.

How to fix scratches in wood. The secret to removing scratches in wood. How to diminish the appearance of scratches in wood.
 After:
How to fix scratches in wood. The secret to removing scratches in wood. How to diminish the appearance of scratches in wood.
 Here's a super good example. Before:
How to fix scratches in wood. The secret to removing scratches in wood. How to diminish the appearance of scratches in wood.
 After:
How to fix scratches in wood. The secret to removing scratches in wood. How to diminish the appearance of scratches in wood.
As I mentioned before, the dents are still there, this just makes the scratches less obvious. The oil in the walnut gets absorbed by the wood. I like to think the nut itself also acts like a filler into the scratch also.

My husband was so amazed by this, he took as many walnuts as he could and went around the house fixing all the scratches :)

Pin for later:
How to fix scratches in wood. The secret to removing scratches in wood. How to diminish the appearance of scratches in wood.


Pin It
I was provided product by DecoArt and compensated to write about this project, but all thoughts, opinions, and ideas are my own :)

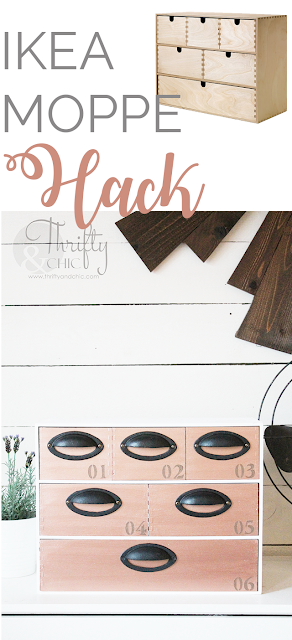
Ikea Moppe storage chest hack. DIY organization ideas. DIY organizer. DIY bathroom organization

It's January! That means it's time to organize! I don't know why, but every time January comes, I am in the mood to completely declutter and organize my house. Today, I've partnered up with DecoArt to bring you this awesome Ikea Moppe Storage Chest hack. You can find these at your local Ikea store for about $17. And they are quite large. Perfect for tons of organization! 
Ikea Moppe storage chest hack. DIY organization ideas. DIY organizer. DIY bathroom organization
 The supplies I used:
Ikea Moppe Storage Chest
Palette knife
1" Number Stencils
Six drawer pulls
Ikea Moppe storage chest hack. DIY organization ideas. DIY organizer. DIY bathroom organization

Step 1: Pull out all the drawers. For this project, I used the backs of the drawers since they were completely flat with no cutout.
Ikea Moppe storage chest hack. DIY organization ideas. DIY organizer. DIY bathroom organization
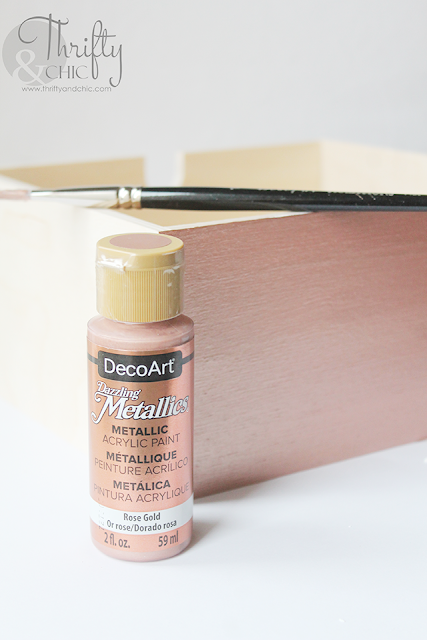
 Step 2: Paint the new front of the drawers and the entire chest Snow White.
Ikea Moppe storage chest hack. DIY organization ideas. DIY organizer. DIY bathroom organization
 Step 3: Next, using a high quality brush, paint over the white on the drawers with the Rose Gold. It took about 3 coats for me to get the coverage I wanted.
Ikea Moppe storage chest hack. DIY organization ideas. DIY organizer. DIY bathroom organization
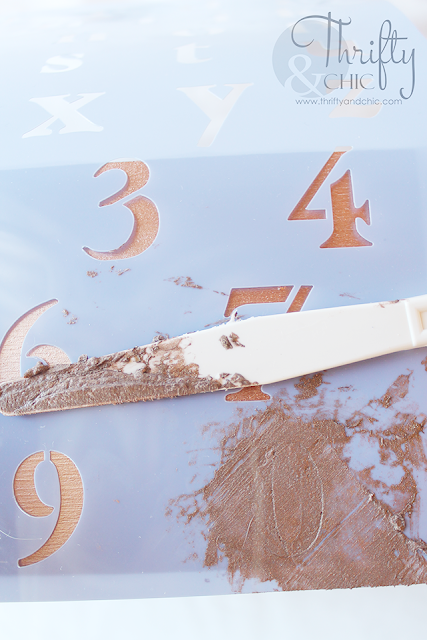
 Step 4: Mix about equal parts of the Texture Paste and the Rich Espresso. Line up the "0" about an inch to an inch and a half from the right bottom edge. You want enough space on the right of the zero for the other numbers, so keep that in mind. 
Ikea Moppe storage chest hack. DIY organization ideas. DIY organizer. DIY bathroom organization
 Using the knife, place the tinted texture paste onto the zero. Scrape it until it's smooth, making sure there's still full coverage.
Ikea Moppe storage chest hack. DIY organization ideas. DIY organizer. DIY bathroom organization
 Repeat this on all the drawers. Let them harden.
Ikea Moppe storage chest hack. DIY organization ideas. DIY organizer. DIY bathroom organization
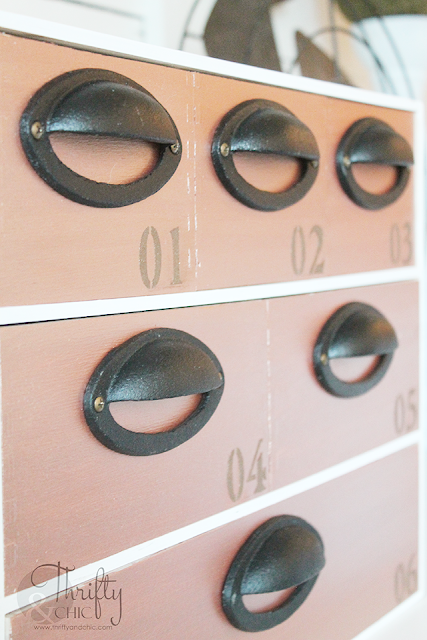
 Step 5: Now do the other numbers. Making sure the bottoms of them line up with the bottom of the zero.
Ikea Moppe storage chest hack. DIY organization ideas. DIY organizer. DIY bathroom organization
 Step 6: Place on the hardware. I found these at Hobby Lobby. I made sure they were centered on each drawer and about a quarter of an inch from the top of each drawer.
Ikea Moppe storage chest hack. DIY organization ideas. DIY organizer. DIY bathroom organization
 Here's a look at the complete white chest. I had plans to paint it the Rich Espresso but I loved how the drawers just popped off the Snow White.
Ikea Moppe storage chest hack. DIY organization ideas. DIY organizer. DIY bathroom organization
 This piece will eventually end up in my bathroom. It's the perfect size for nail polish, makeup, and hair accessories. 
Ikea Moppe storage chest hack. DIY organization ideas. DIY organizer. DIY bathroom organization
 The color behind this was actually inspired by my two year old's Christmas ornament. She colored it with this Rose Gold and Rich Espresso and I fell in love with the combination. 
Ikea Moppe storage chest hack. DIY organization ideas. DIY organizer. DIY bathroom organization
 The idea for the texture paste was simple. First, it gives great 3 dimensional effect, but also the Rich Espresso will not adhere correctly or at all to the glossy metallic finish of the Rose Gold without it. 
Ikea Moppe storage chest hack. DIY organization ideas. DIY organizer. DIY bathroom organization

Ikea Moppe storage chest hack. DIY organization ideas. DIY organizer. DIY bathroom organization
Be sure to check out all the other Moppe hacks! You can check out DecoArt at www.decoart.com and on all their social channels: 


Disclosure of Material Connection: This is a “sponsored post.” The company who sponsored it compensated me via a cash payment, gift, or something else of value to write it. Regardless, I only recommend products or services I use personally and believe will be good for my readers. I am disclosing this in accordance with the Federal Trade Commission’s 16 CFR, Part 255: “Guides Concerning the Use of Endorsements and Testimonials in Advertising.”