I have a love hate relationship with spring right now. I want it to come, I'm totally wishing the snow away, but I'm stilling wondering what the heck happened to summer ;) My house has been in a pretty stagnant state since Christmas. Luckily, all my Christmas decor is down, but I haven't added any fresh bits of spring yet. I decided that since March is next week, that it's about time. I actually had the items to make this wreath stashed away since Christmas, so I'm glad to finally get them out and use them!
This is pretty much the easiest wreath I have ever made. I used a grapevine wreath and some faux eucalyptus garland I got from Hobby Lobby.To start the wreath, I found the spine of the garland. That's the part that all the leaves are attached to. I started at one end, and then just started hot gluing the spine around the middle of the wreath making sure that no leaves were underneath it.Once I went around the entire wreath, I used some wire snippers, and cut the spine. My wreath looked a little crazy at this point. With the extra pieces of the garland, I separated them from the spine. Then glued them into the bare spots of the wreath, filling it in. I also tried to get the majority of the leaves going in the same direction by bending the wires around the wreath. This made it look not so crazy like the picture before.I love how full this wreath is. It looks great on my mantel and springs it up :)
The best part, is that it cost about $20. With using a coupon and sales, the garland was $17ish and the wreath was under $3. Not bad :) My favorite part is just how simple it is to make.
I have some big plans for our dining room ceiling in the upcoming months. But, I wanted to try out this idea before I committed to the other thing. We have a perfect spot for some corbels in the entry to our dining room. I saw some corbels at Hobby Lobby that I fell in love with, and decided that they would be super simple and cheap to make. And they were! The supplies I used:Two 2x2 wood pieces at 10" longOne 1x2 wood piece at 7" longMiter sawWood glueWood stain in dark walnutPetroleum jellyWhite latex paintSandpaper
Step 1: Have your wood cut to size. Step 2: On one end of each of the 2x2s, cut a 45 degree angle. Step 3: Measure 1/2 inch in from the longest side of the 45 degree angle, mark it, and then do a straight cut down. Step 4: Cut a 45 degree angle on each end of the 1x2, opposite directions so it appears similar to the below picture Step 5: Using wood glue, attach the two 2x2s together. You can use a nail gun at this point also to secure them. I didn't, I just used wood glue during this whole process to keep it simple. Step 6: Add the 1x2 to the middle of the piece with wood glue (and nails, optional). Step 7: Stain the corbels.
Step 8: Add petroleum jelly to the edges and corners. Step 9: Paint with white latex paint. It took about 3 coats for mine to fully cover. Step 10: Use the sandpaper to scruff up the edges and let the stain show through. The more petroleum jelly you placed on the entire piece will dictate the amount of distressing you will see. And they are done! Now time to hang them :) Or just use them as cool faux architectural salvage pieces in your decor. I hung mine in the corner with 2 1/2 inch nails with my nail gun.
Can't wait to see what's next for this ceiling! My husband might freak, so I may have to wait until he's gone for a few days lol :)
Pin for later:
Do you have one of those walls, or little nooks or crannies, that you just can't find the right piece for? I have plenty of those, but the biggest one...as in the most annoying one...is in my living room.

Step 1: I measured the circumference that I wanted, which was 26 inches. I cut 6 pieces of the shiplap at 27 inches long. If you are doing this with a different circumference, just make sure that the when you put the pieces all together, it is at least 1 inch longer and wider than the size you want.
Step 2: Put a bead of wood glue down on where the pieces are to join. I actually put my weights to some good use by placing them on the seams to add pressure so the glue would adhere properly. Ask me when the last time I used these weights were? lol Well, technically earlier today when I put them back in the closet ;) I did a couple of reps to make sure I still had it me..and I totally did :) Keep the weights on overnight or until you are sure all the wood glue has done it's job.
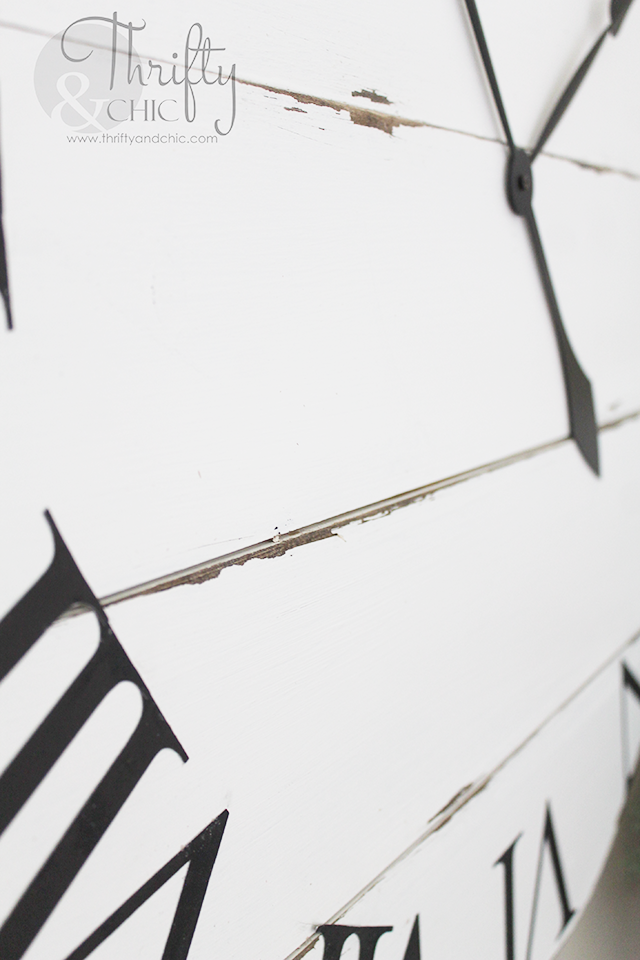
Step 3: Find the middle of the piece, on the back side, and place a tack right in the center. Then get a piece of string and tie it onto the marker. The string should be long enough to have the marker go to about 1/2 inches in on the 4 sides of the wood. Draw a circle around the wood, trying to make sure the string stays in place and the marker is at the same angle the whole time. Step 4: Use a jigsaw to cut out the circle. This is when you'll know for sure if your glue did it's job :) If you have a piece that falls off, just glue it again. Sand the edges when you are done. Step 5: Stain. I used Minwax Dark Walnut for mine. I just did one light coat. Step 6: Place a small amount of petroleum jelly on the edges and in the cracks, or anywhere else you would like the stain to show through on the paint. Step 7: Paint! I used Swiss Coffee by Behr for my color. If you see that the paint is seeping into the lines, use a toothpick to smooth it out and clean out the gaps. Step 8: Once the paint is dry, use the sandpaper or sanding block to scuff up the piece a little bit. You shouldn't have to work to hard at sanding if you found a part that has the petroleum jelly on it. Just sand until you get the desired look you want. Step 9: Figure out the layout of your numbers. I sat with these numbers like this for about an hour thinking that it just didn't look right. It's so heavily weighted on the left, which was driving me nuts. So, then I decided to do it in a circle, and made my numbers a little bit thinner. I used my Silhouette to cut these out. The font is Times New Roman regular at 3" high. Step 10: Once I figure out where I wanted all the numerals and had them laid out, I used a small paint brush and brushed some modge podge onto the backside of each one. I was thinking about doing the top, but then it would give it a shiner look than the rest of the piece. So, I decided not too. I figure that if the numerals tear off and get weird looking, it adds to the character of the piece. Step 11: Now on the front side, find the center again, and drill a hole. You can make this a working clock at this point or just use the clock hands like I did. I screwed in the hands at the center point. Don't screw them in too tight, or the hands will sit too high off the surface. Tighten them just enough that they don't fall. Step 12: Place a D-ring or two on the back to hang. Mine is large, but pretty light weight considering the material I used. So, I just used one large D-ring and hung it on a screw. Here's a close up of the numbers and the distressing. This just brought this space to life. I love it so much! I had plans to continue the board and batten onto this wall and now I just might not since I like how it looks here. I know, I could always move it up..but still :)Most of the clocks that I have seen similar to this...working and non-working (although it would only cost about $6 more to make this work) are over $50 on sale. Especially for this size. I bought two 8' shiplap boards which cost roughly about $9 and the $6 clock hands. Everything else I had on hand. So, the total for this was about $15 out of pocket.
Pin for later: