This post contains affiliate links.
Last week, I shared with you that I'll be posting some projects going on at my mom's new house. We are trying to add character to her builder grade new home. She came late into the building process where the house was already framed, so she wasn't able to pick out fun things like a fireplace. She also lost a lot of display and storage space when she moved from her old house. So, I decided to incorporate the two things she wanted the most onto this wall of her living room: a fireplace (although electric) and shelves! ...and of course, shiplap.
 Here's the before of her living room before we got started with the process. Super boring and not a lot of character going on.


 So, using one side of the bookshelf, I traced where I needed to cut out more. I then used my jigsaw to cut it out.

 It's not super pretty, but I didn't care how perfect it was at this point since molding was going to be placed here later.
 Deciding on the placement of the bookshelves and the height took a lot of measuring and decisions. Ultimately we decided to place two bookshelves on this side.
 And 1 1/2 on the left side with space in between for the fireplace and shiplap. We had to do a half size of the bookshelf because of the light switches. There was no other place to put the switches that made logical sense, so we had to compromise.


 Next was adding the molding to finish off the look. I found 5" molding to do the bottom of the shelves so they lined up perfectly with the original baseboards. I miter cut each corner for a cleaner look.
 I added 1x3" molding to the top. I did this to the front and outside, but not the inside yet which I'll share why with you below.
 Here's what adding the molding does. To the left, it has the partial molding on the top and bottom also vertical along the seams, and on the right, nothing. Big difference!
 So, for the inside part of the bookcases, I wanted to plank/shiplap the wall, so instead of cutting out a small section in the shiplap, I just placed that on the wall first, and then finished the molding on the top measuring from the shiplap piece to the corner.

 I then went down the wall with the shiplap. Securing it into the studs.
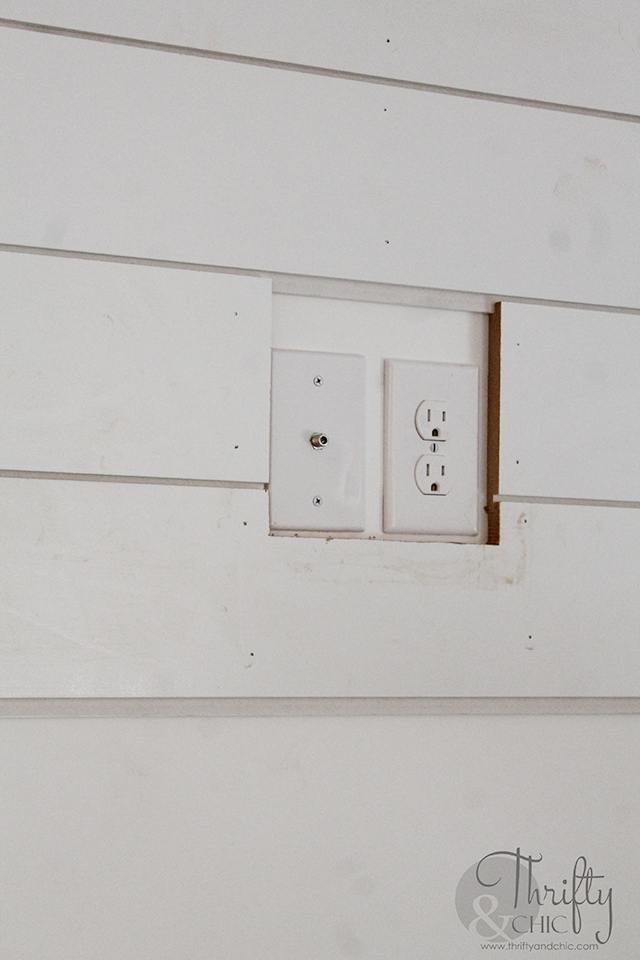
 I made a cutout for the outlets just in case a future TV would be hung here.
 Once I got close to the bottom, I stopped the shiplap.
 I then built a 5" high platform for the fireplace. I wanted to incorporate the fireplace in some way, and not have it look like it was just sitting there. I used 90 degree mending plates to help support the weight of the fireplace along with the 5" mdf molding. You can look at this picture below to show exactly how I did it.
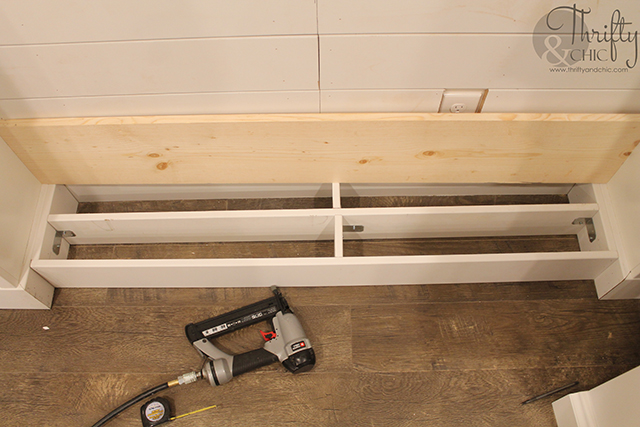 I then used a 1x10" board cut to fit on the top.
 To finish the front, I used my jigsaw to cut out a little square on a 1x2 molding piece on each side. I secured it with 1 1/2" nails.
 To finish the entire look I used quarter round along the top, and side that had the opened wall. I also secured 1x2s along each vertical edge.
 Here's a some what finished look. Now it was time to add the fireplace.


Here's a good look at how the fireplace blends into the platform and molding. The white I used for the paint was Basic White from Sherwin Williams.

 And more looks of the molding and how it seamlessly blends in.

 The sections where the two bookcases touch was the perfect size for the 1x2 molding.
 Decorating this was fun...and somewhat challenging. Trying to use a blend of my moms old pieces along with new ones.
 She has a grundle of family pictures and wanted to use as many as she can. I tried to blend them into the shelves using ones that had soft or similar colored frames.
 Small baskets were used along the shelves to help with storage and to have a place for your eye to rest.
 Here's another before of this plain space.
 And now with the bookshelves and electric fireplace!

Another look at the before just because I love the transformation.
 ...and after of the same angle.


 The intention was to hang her TV above the mantel, but then I placed this mirror she had bought at Hobby Lobby years ago here and it looked amazing! Now she doesn't want to put her TV back :)
 But, just in case she wants to, the outlets are still there!
This is the coffee table that I made for her a couple of years ago. I always wanted to share it with you guys in her place, but never had a chance. Well, here it is!


 The couches and chair are also from Ikea. The rug is from Amazon.


PIN FOR LATER:


Disclosure of Material Connection: Some of the links in the post above are “affiliate links.” This means if you click on the link and purchase the item, I will receive an affiliate commission. Regardless, I only recommend products or services I use personally and believe will add value to my readers. I am disclosing this in accordance with the Federal Trade Commission’s 16 CFR, Part 255: “Guides Concerning the Use of Endorsements and Testimonials in Advertising.”
Last week, I shared with you that I'll be posting some projects going on at my mom's new house. We are trying to add character to her builder grade new home. She came late into the building process where the house was already framed, so she wasn't able to pick out fun things like a fireplace. She also lost a lot of display and storage space when she moved from her old house. So, I decided to incorporate the two things she wanted the most onto this wall of her living room: a fireplace (although electric) and shelves! ...and of course, shiplap.


Here's the after at the same angle:

Here's the process I went through to create this look. First off, I used the white Billy bookcases from Ikea along with two of their extensions for each bookshelf. The bookcases come with a cut out for the baseboards, but the baseboards in this room were 2" higher than the cutout.


I then added the two extra extensions to each bookshelf. I made sure to add the hardware to prevent these from tipping over on each section of the bookcases.


This is the coffee table that I made for her a couple of years ago. I always wanted to share it with you guys in her place, but never had a chance. Well, here it is!


Here are a few more full room views :) I'll be adding floor to ceiling board and batten in here in the coming months. I can't wait to see the character that it adds! So long building grade!


PIN FOR LATER:


