Back in the day before shiplap was ever a mainstream thing, I added "planks" to some walls in my home trying hard to bring more character. We called this planking the wall. Most people think shiplap is just a trend and will die. I'm here to tell you, I don't believe this at all. Planking and shiplap have actually been around for decades. It's just now that the decor community and homeowners are starting to take notice because how mainstream it has become due in part to shows on HGTV :) ... you know the one! 

I think this look is timeless, along with other things like board and batten. I don't have a room in my house that doesn't have either one of these. Because of this, I have tried many different ways to do shiplap or to get the shiplap look. I love all of these tutorials, some are easier than others, some cost way less. It's really up to you to decide which is the best method of shiplap for you and your space.

Just to take a stroll down memory lane, I'm going to start on the tutorials from oldest to newest just for the heck of it.

Number 1 Shiplap Method: Cedar Planks
Back in the day, I had a desire to transform my tuscan, color rich home into nothing but white while still adding character. I wanted to paint my table white, but my husband put his foot down. So, instead, I created essentially a table top made out of white cedar planks to go on top of it. It worked for a hot minute, but then I didn't like it. I ended up just placing the 8x4 piece against the wall in my dining room trying to figure out what to do next and had an epiphany. I needed to add that whole thing onto my wall. With some trial and error, I figured it out. This is hands down, my most favorite wall in my house. I did this about 8 years ago and haven't had a single problem with it since!  
Tutorial here:


Best ways to do shiplap. How to do shiplap. Shiplap tutorials. What's the best method to do shiplap. Shiplap methods. Is shiplap going out of style?

Number 2 Shiplap Method: Masonite
My front living was just a big beige box. No character at all. I loved how the planks/shiplap turned out in my dining room, but I wanted to try a different, cheaper method. I went to the store and found the cheapest 8x4 board, which was masonite. I had them cut them in 6 inch strips. I took them home and hung them all by myself in a couple of hours. It was easy and cheap!
Full tutorial here:
Best ways to do shiplap. How to do shiplap. Shiplap tutorials. What's the best method to do shiplap. Shiplap methods. Is shiplap going out of style?

Number 3 Shiplap Method: Pine boards
When I turned my office into a guest rooms years back, I wanted to add some character to the wall behind the bed. I decided to do another shiplap/planking method. For these ones, instead of painting it white, I stained them. It is now my little one's bedroom, and I love the contrast of the wood against the white. 
Tutorial here:
Best ways to do shiplap. How to do shiplap. Shiplap tutorials. What's the best method to do shiplap. Shiplap methods. Is shiplap going out of style?

Number 4 Shiplap Method: Tongue and Groove
I have a super little laundry room, but I wanted to make it cute and functional. After adding built in shelves, I needed something on the wall underneath them. I thought about doing tile, but then decided on shiplap again. This is around the time it became a mainstream thing and tongue and groove shiplap was starting to be sold in home improvement stores. These boards make the shiplap look super clean. It's definitely a more modern way to do it compared to method 1 :) 
Tutorial here:
Best ways to do shiplap. How to do shiplap. Shiplap tutorials. What's the best method to do shiplap. Shiplap methods. Is shiplap going out of style?

Number 5 Shiplap Method: Fake it
I'm not going to share with you how I did this, you'll have to check out the tutorial. But this was the cheapest method ever. And it turned out great! I did this shiplap method on two walls in my house. It's so easy you won't even have to visit the home improvement store :) 
Tutorial here:
Best ways to do shiplap. How to do shiplap. Shiplap tutorials. What's the best method to do shiplap. Shiplap methods. Is shiplap going out of style?

I know there will be some more shiplap/planks in my future, just haven't decided where yet :) Well, actually I know exactly where....it's about 20 feet high on a 2 foot ledge. So, I'm trying to get the courage to get up there and do it :) What's your favorite way? Do you have a different way you swear by? 


Follow me on my social for sneak peaks, live videos, and fun new things that are going on!
  

Pin for later:
Best ways to do shiplap. How to do shiplap. Shiplap tutorials. What's the best method to do shiplap. Shiplap methods. Is shiplap going out of style?

Best ways to do shiplap. How to do shiplap. Shiplap tutorials. What's the best method to do shiplap. Shiplap methods. Is shiplap going out of style?

Best ways to do shiplap. How to do shiplap. Shiplap tutorials. What's the best method to do shiplap. Shiplap methods. Is shiplap going out of style?

Best ways to do shiplap. How to do shiplap. Shiplap tutorials. What's the best method to do shiplap. Shiplap methods. Is shiplap going out of style?

Best ways to do shiplap. How to do shiplap. Shiplap tutorials. What's the best method to do shiplap. Shiplap methods. Is shiplap going out of style?


This post contains affiliate links.

Isn't the time between Christmas and Spring such a weird time for decorating? Like, how exactly are you supposed to decorate for the months of January and February? All your Christmas is down, and your house is looking oh so bare, but it just waaaaay to early to introduce spring florals. Over the past few years, I have honed in on what exactly January and February decor should look like. It took some time to get used to it, but when you think about it, it totally makes sense. Decorate inside with what you see outside. I won't be seeing any flowers soon, but I do see beautiful trees and bushes covered in a perfect dusting of snow. And because January and February are usually so dreary weather-wise, and shorter days, it's good to bring in bright neutral colors! Don't live in a dark cave those dark winter months :)
Tips on how to decorate after Christmas. How to decorate during January and February. Winter decorating ideas. How to decorate for winter. Farmhouse winter decor and decorating ideas. Winter mantel decor. How to decorate your coffee table.
 Clock: Tutorial
I usually take down my Christmas stuff at the beginning of January. I learned this year that the 12 days of Christmas are actually AFTER Christmas, and not before. I may have been hiding underneath a rock, but I didn't know this. So, it's actually old tradition to not take your tree down until the 6th of January. So, this is helpful to all of us who wonder when exactly should you take down Christmas. Of course, to each their own :) but there's a good guideline! 

So, to start taking down my Christmas in attempt to leave up Winter, I try to take all what I think as Christmas-y down...like obvious Christmas stuff. Things that say "Jolly", "Santa", "Noel", ect. I then remove all the red, glitz and glitter. The stockings and the ornaments from the trees are gone. Christmas countdowns are put away. I'm usually left with a pretty neutral scheme along with greens. Some greens are flocked, and some aren't. This is what Winter is to me. 
Tips on how to decorate after Christmas. How to decorate during January and February. Winter decorating ideas. How to decorate for winter. Farmhouse winter decor and decorating ideas. Winter mantel decor. How to decorate your coffee table.
Shiplap: Tutorial    Builtin shelves: Tutorial


Last year, I kept up my big trees through most of January and into February. I felt like this was too long. Sometimes the magic of Christmas is because it's so fleeting and only lasts just for a little while. Even though all the "Christmas" was gone, the big trees reminded me too much of it. So, this year, I took down my big trees and only left the little ones. 
Tips on how to decorate after Christmas. How to decorate during January and February. Winter decorating ideas. How to decorate for winter. Farmhouse winter decor and decorating ideas. Winter mantel decor. How to decorate your coffee table.
Along with smaller trees, I kept up a lot of garland. The garland I chose doesn't have any red berries or too much sparkle. I chose the ones that seemed the most natural. Ones that looked like they could totally belong outside. 
Tips on how to decorate after Christmas. How to decorate during January and February. Winter decorating ideas. How to decorate for winter. Farmhouse winter decor and decorating ideas. Winter mantel decor. How to decorate your coffee table.
Vintage Wood Map: DecorSteals
Tips on how to decorate after Christmas. How to decorate during January and February. Winter decorating ideas. How to decorate for winter. Farmhouse winter decor and decorating ideas. Winter mantel decor. How to decorate your coffee table.
I also went completely neutral in most of my rooms, letting the greens of the trees and garland pop. 
Tips on how to decorate after Christmas. How to decorate during January and February. Winter decorating ideas. How to decorate for winter. Farmhouse winter decor and decorating ideas. Winter mantel decor. How to decorate your coffee table.


Tips on how to decorate after Christmas. How to decorate during January and February. Winter decorating ideas. How to decorate for winter. Farmhouse winter decor and decorating ideas. Winter mantel decor. How to decorate your coffee table.
White Ruffle Bedspread: link and link.   Greyish/Taupe Coverlet: link
Ruffle Diamond Pillow Shams: link   Ruffle Euro Shams: link
Storage Bench: link (similar)
Along with every other time of year, textures are so important. It's a good way to bring interest to the neutral color scheme...or interest to any color scheme at all. Bring in textures through organic materials like wood and pine cones. The garland and trees bring in texture all on their own. Add texture through throw blankets and pillows. 
Tips on how to decorate after Christmas. How to decorate during January and February. Winter decorating ideas. How to decorate for winter. Farmhouse winter decor and decorating ideas. Winter mantel decor. How to decorate your coffee table.

Tips on how to decorate after Christmas. How to decorate during January and February. Winter decorating ideas. How to decorate for winter. Farmhouse winter decor and decorating ideas. Winter mantel decor. How to decorate your coffee table.
And of course, layers are sooo important during the cold winter months. Layers help bring in comfort especially with the bareness you feel when all the Christmas stuff is gone. I add layers through simple things like window treatments, rugs, pillows, and blankets. 
Tips on how to decorate after Christmas. How to decorate during January and February. Winter decorating ideas. How to decorate for winter. Farmhouse winter decor and decorating ideas. Winter mantel decor. How to decorate your coffee table.

 Layers can also be just adding more to things like garland in between these candlesticks, plus the runner. 

Tips on how to decorate after Christmas. How to decorate during January and February. Winter decorating ideas. How to decorate for winter. Farmhouse winter decor and decorating ideas. Winter mantel decor. How to decorate your coffee table.
Adding trays onto benches, beds, or coffee tables also add that extra little comfort. I like to fill my trays with books, greenery, and little extras. 
Tips on how to decorate after Christmas. How to decorate during January and February. Winter decorating ideas. How to decorate for winter. Farmhouse winter decor and decorating ideas. Winter mantel decor. How to decorate your coffee table.

Tips on how to decorate after Christmas. How to decorate during January and February. Winter decorating ideas. How to decorate for winter. Farmhouse winter decor and decorating ideas. Winter mantel decor. How to decorate your coffee table.
It used to be that keeping even small little trees out after December was so weird to me. But as I said before, when you think about it, it makes sense to leave them out! I like to think that nature dictates how you should decorate (for the most part....at least those of us who have 4 hard seasons). Flowers in Spring. Pumpkins and fall colors during Fall. Summer brings lots of happy bright colors with greens. And Winter...well, snowy trees and branches. 

What do you do for your decor during those odd dreary months of January and February? 


Follow me on my social for sneak peaks, live videos, and fun new things that are going on!


pin for later:
Tips on how to decorate after Christmas. How to decorate during January and February. Winter decorating ideas. How to decorate for winter. Farmhouse winter decor and decorating ideas. Winter mantel decor. How to decorate your coffee table.

Tips on how to decorate after Christmas. How to decorate during January and February. Winter decorating ideas. How to decorate for winter. Farmhouse winter decor and decorating ideas. Winter mantel decor. How to decorate your coffee table.

Tips on how to decorate after Christmas. How to decorate during January and February. Winter decorating ideas. How to decorate for winter. Farmhouse winter decor and decorating ideas. Winter mantel decor. How to decorate your coffee table.

Disclosure of Material Connection: Some of the links in the post above are “affiliate links.” This means if you click on the link and purchase the item, I will receive an affiliate commission. Regardless, I only recommend products or services I use personally and believe will add value to my readers. I am disclosing this in accordance with the Federal Trade Commission’s 16 CFR, Part 255: “Guides Concerning the Use of Endorsements and Testimonials in Advertising.” 
I was provided product by DecoArt and compensated to write about this project, but all thoughts, opinions, and ideas are my own :)

I used to be so organized while growing up. Everything had it's place. I'm not sure what happened in my 20s, but for some reason that is sooo not the case anymore. I like to think everything has it's place still, but I'm definitely far from the organized person I was in the past. I have lots of spots of clutter. 

I feel like January is always a good time to start organizing and decluttering challenges. I'm not up for a challenge itself, but I'm all for organizers to help keep my life a simpler...and cleaner. This cute little one can be found on Amazon. 
Organizer hack. Organization and decluttering ideas. Bathroom organization ideas. Desk organizer. DIY desk organizer makeover.
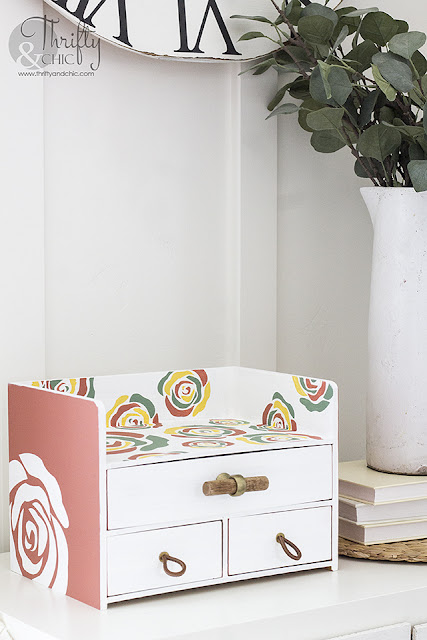
 Not quite my style. It's kind of screaming for a makeover, don't you think? I updated it to look like this: 
Organizer hack. Organization and decluttering ideas. Bathroom organization ideas. Desk organizer. DIY desk organizer makeover.
 Paint can do amazing things! I used DecoArt's Americana Acrylics to achieve this look. The colors I used: White Wash, Desert Cactus, Dried Clay, and Summer Squash. 
Organizer hack. Organization and decluttering ideas. Bathroom organization ideas. Desk organizer. DIY desk organizer makeover.
Other products I used:

  • Sandpaper
  • Rose cut out in multiple sizes (I cut mine out using my Silhouette)
  • Leather stripes and/or draw pulls
  • 2 washers
  • Drill


Step 1: This surface is pretty shiny, so I scratched it up a little using some sandpaper. This will help the paint adhere better.
Organizer hack. Organization and decluttering ideas. Bathroom organization ideas. Desk organizer. DIY desk organizer makeover.
 Step 2: Paint the whole thing, besides the inside, with White Wash. This will take multiple coats. Use a hair dryer to speed up the process.
Organizer hack. Organization and decluttering ideas. Bathroom organization ideas. Desk organizer. DIY desk organizer makeover.
 Make sure to get the edges for a good even look.
Organizer hack. Organization and decluttering ideas. Bathroom organization ideas. Desk organizer. DIY desk organizer makeover.
 Step 3: Using vinyl cut outs, place your design on the top shelf of the organizer. I used this rose motif in multiple sizes. To get it in the corners, bend the design and place it in the corner first, and then continue to press down the design from there. My largest rose is about 7" in diameter. The smallest one is about 3".
Organizer hack. Organization and decluttering ideas. Bathroom organization ideas. Desk organizer. DIY desk organizer makeover.
 Step 4: In a somewhat random, but strategically placed way, paint some of the petals of each rose with Desert Cactus. I used a stipple brush for this, but instead of a blotting technique, I smoothed it out. 
Organizer hack. Organization and decluttering ideas. Bathroom organization ideas. Desk organizer. DIY desk organizer makeover.
 Step 5: Next, paint some petals with the Dried Clay.
Organizer hack. Organization and decluttering ideas. Bathroom organization ideas. Desk organizer. DIY desk organizer makeover.
 Step 6: Now finish each rose off with painting the remainder petals Summer Squash.
Organizer hack. Organization and decluttering ideas. Bathroom organization ideas. Desk organizer. DIY desk organizer makeover.
 Step 7: Carefully peal off the vinyl to reveal the design. Do any touch ups if necessary. 
Organizer hack. Organization and decluttering ideas. Bathroom organization ideas. Desk organizer. DIY desk organizer makeover.
 Step 8: Paint the sides of the organizer with Dried Clay. I then added another rose in White Wash. You can either do this beforehand by placing the petals down first, and then painting over it with the Dried Clay. Or add the stencil of the rose afterwards, and painting the White Wash over the Dried Clay.
Organizer hack. Organization and decluttering ideas. Bathroom organization ideas. Desk organizer. DIY desk organizer makeover.
 Step 9: To add a little interest to the drawers, I painted the sides with Dried Clay, so when you pull them out there will be some color.
Organizer hack. Organization and decluttering ideas. Bathroom organization ideas. Desk organizer. DIY desk organizer makeover.
 Step 10: I decided to use the back of each drawer as the front. I'm not a fan of that little cutout. On the back of each drawer, I found the middle and drilled a small hole. 
Organizer hack. Organization and decluttering ideas. Bathroom organization ideas. Desk organizer. DIY desk organizer makeover.
 Step 11: On the bottom two drawers, I added my own little handle by using 8" leather strips. I pulled the strips through a washer, and then through the hole. I tied the leather into a knot on the backside of the drawer. 
Organizer hack. Organization and decluttering ideas. Bathroom organization ideas. Desk organizer. DIY desk organizer makeover.
 I used a cute little wood pull I got from Hobby Lobby on the top drawer. 

Here's the finished look:
Organizer hack. Organization and decluttering ideas. Bathroom organization ideas. Desk organizer. DIY desk organizer makeover.
 I love how this design looks different from every angle. The question is, what area is this going to help organize in my house? My girls are already asking for it in there bathroom. So, I think that's where it's going to live. 
Organizer hack. Organization and decluttering ideas. Bathroom organization ideas. Desk organizer. DIY desk organizer makeover.
The top will be perfect for little mason jars full of cotton balls and q-tips. The drawers will be great organizers for hair supplies! What do you think? What you would you use this little organizer for? The possibilities are endless! 
Organizer hack. Organization and decluttering ideas. Bathroom organization ideas. Desk organizer. DIY desk organizer makeover.
Want more inspiration like this from DecoArt and other amazing bloggers? Follow here!
www.decoart.com
Facebook
Instagram
Pinterest


Follow me on my social for sneak peaks, live videos, and fun new things that are going on!


Want this desk organizer? Find it here:


Pin for later:
Organizer hack. Organization and decluttering ideas. Bathroom organization ideas. Desk organizer. DIY desk organizer makeover.


This means if you click on the link and purchase the item, I will receive an affiliate commission. Regardless, I only recommend products or services I use personally and believe will add value to my readers. I am disclosing this in accordance with the Federal Trade Commission’s 16 CFR, Part 255: “Guides Concerning the Use of Endorsements and Testimonials in Advertising.” Disclosure of Material Connection: I received one or more of the products or services mentioned above for free in the hope that I would mention it on my blog. Regardless, I only recommend products or services I use personally and believe will be good for my readers. I am disclosing this in accordance with the Federal Trade Commission’s 16 CFR, Part 255: “Guides Concerning the Use of Endorsements and Testimonials in Advertising.” Disclosure of Material Connection: This is a “sponsored post.” The company who sponsored it compensated me via a cash payment, gift, or something else of value to write it. Regardless, I only recommend products or services I use personally and believe will be good for my readers. I am disclosing this in accordance with the Federal Trade Commission’s 16 CFR, Part 255: “Guides Concerning the Use of Endorsements and Testimonials in Advertising.”